50 Top Detailing Tips
A full half-century of professional tricks and tips put together specifically to push your detailing to the next level.

 Skip to content
United Kingdom

The Driveway Warrior Course imparts the fundamental skills and knowledge on the essential detailing products based around the most important detailing process of them all – the wet work.
In detailing terms, the wash stages are the most dangerous when it comes to inflicting damage on sensitive surfaces such as paintwork and gloss plastics. This means that learning how to clean your vehicle safely is vital to ensure that potentially harmful particulates and deposits are removed without inflicting swirl marks, scratches and other defects. Even when you have limited access to products and professional equipment. The truth is that paint correction and polishing are amazing for making your vehicle look stunning, but all this work can go to pot in just a few weeks when using bad wash techniques.
This ‘maintenance wash’ process is the foundation of all detailing and regardless of the level of soiling, the Driveway Warrior Course teaches you how to do it all from start to finish, at home or on the road, without the need for an industrial unit or pro valeting setup.
We'll take you through the entire process from safely deep-cleaning wheels, brake dust removal and pre-washing. To showing you the imperative tricks to obtaining the safest contact wash, the most thorough interior maintenance and even topping up ceramic paintwork protection. Offering you the pro tips employed by mobile detailers to maximise your time and the cost-effectiveness of your cleaning products. You’ll also learn how to complete all levels of maintenance without stripping or degrading previously-applied protection layers.
Along the way we’ll answer all the commonly asked questions such as: Why do I need to use a pre-cleaner and a snow foam? What kind of protection can be used during my maintenance wash? Where do I start the cleaning process? What is the difference between maintenance and a full detail? And, Why are 3 buckets always better than one?
Our step-by-step course comes with the full rundown of the basic essentials you need for all cleaning processes – products and accessories that no detailing kit should ever be without. These include such indispensable items as Avalanche Snow Foam, Citrus Power Bug & Grime Remover, Lather Car Shampoo, and of course, our Professional Detailing Buckets.
With our Driveway Warrior Course, you’ll see how you can wash to a professional standard, safely take on every individual cleaning process and see exactly what can be achieved in a limited timeframe.
The Basics - See how often you should wash your vehicle, how long it takes, the difference between maintenance and a full detail, and the essential products and accessories you'll need along the way.
Wheels – Learn the fundamentals of deep cleaning wheels and tyres, and why you should complete this process first on every detail.
Pre Wash – We always say that the pre wash process - using a suitable pre-cleaner and snow foam - is the most important part of the operation. Here’s how it’s done, and why.
Contact Wash – Not just the detailer’s famous two-bucket wash, but the science behind why you need the correct cleaning agent, wash mitt and route around the vehicle.
Protection - How to install or top up ceramic protection during your wet work. Find out why you don’t always have to wait until after your wash.
Drying – Combatting watermarks along with the impurities often found in tap water - the water you use to clean your car isn't always pure.
Interior – Get that cabin back to factory fresh with the correct products to not only clean but kill off viruses, bacteria and other potentially harmful nasties.
Finishing Touches – Discover those little added extras that will always push your finish to the next level.
Now we can get started with your number one step-by-step guide to performing a professional maintenance wash as we take this real-world daily driver from dirty back to sparkling. It's all about safely removing the grime and installing the deep gloss that this one deserves...
As with any detail, the initial inspection is an important part of the process, ascertaining the work that needs to be completed, the concentration of contamination, what products can be used for specialist finishes (such as wheels and protected paintwork) and often the condition of the vehicle itself. So, before we jump into our routine maintenance detail, let's take a look at the daily driver we've drafted in for our Driveway Warrior Course.
This 2.0 litre, 4-cylinder, turbocharged pocket rocket packs a punch with 261bhp from the factory and has just 55,000 miles on the clock. There's no doubt that this 2011 Volkswagen Scirocco R has seen plenty of the contamination typically associated with a year-round daily-driver, but even in its current state it's clear that this car is something very special.
Production of the Volkswagen Scirocco ceased in 2017 and we think these will inevitably become bona fide modern classics in the coming years.
It's no secret that dark coloured cars are some of the most challenging for hiding paintwork imperfections and, finished in Deep Black Metallic, this VW certainly falls into that category. Whilst we are looking at routine maintenance, rather than carrying out any polishing or correction processes, it's still important to use safe techniques to ensure that any problems aren't compounded. This not only safeguards the finish that is already there but ensures that the task isn't made significantly more difficult when it comes to performing a full detail at another time.
On inspection, the paintwork on our daily driver seems to be in good condition, although we'll only really know how good after the grime is fully removed. When undertaking the wash stages on your own vehicle, it is only when they're finished that you can consider whether further detailing, including correction, or topping up protection is required.
The detailing history is also a consideration, especially if the vehicle is a new purchase. Has the vehicle undergone a recent correction? Is the paintwork already protected with a wax, sealant or coating? Although the safe maintenance process itself doesn't vary too much due to these considerations, it's good to know with regards to obtaining the best finish, and the products you choose along the way. In our case we know that this vehicle has been previously protected with our range of Caramics Ceramic Coatings, so we have the option to choose products designed to actively boost, and prolong the life of these protection layers.
Another consideration is whether there's any specialist parts or finishes that require different products. It's notable that this is not just any factory standard Volkswagen Scirocco R.
Modifications such as the Tiguan R-Line Savannah alloy wheels with low profile tyres, the subtle drop on VWR suspension, and the aggressive look of the Genuine VWR Cup Spoiler all add to the appearance. However, aside from removing all the dirt, spider's nests and cobwebs, do these OEM+ tweaks need extra consideration in the products used? The answer in this case is, apart from a little less room in the arches, is no. OEM parts are built to stand up to the grime on daily drivers and more intense cleaning. If however, aftermarket parts such as wheels with sensitive finishes, carbon fibre or gloss plastic add-ons and vinyl wraps are used, you may need to take extra care throughout the cleaning processes or tailor some products to suit the more sensitive finishes.
Below you'll find a list of all the detailing products and accessories used throughout this course. While this is by no means an exhaustive list, these are the essentials that, from years of experience, we'd recommend having available to cover any maintenance detail at any time of year…
Cleaning:
Revolution Wheel Soap - Breaks down brake dust and road grime, while being gentle on specialist finishes. Can be used as a stand-alone sealant-friendly cleaning agent on the most sensitive wheels, or as a supplementary cleaner and lubricant when agitating/brushing-in other wheel cleaners.
Imperial Wheel Cleaner - Acid-free, spray-on wheel cleaner suitable for regular use on the most contaminated painted and powdercoated alloy wheels. Available as a ready-to-use spray (500ml) or as a concentrate (1&5-litre) that can be diluted to suit any level of soiling.
Tread Tyre Cleaner - Heavy duty, spray-on tyre cleaner designed to break down and lift the most ground-in contamination.
Citrus Power Bug & Grime Remover - Wax, coating and sealant-safe, ready-to-use pre-cleaner that uses special surfactants to lift and encapsulate heavy particulates, allowing them to be safely rinsed away.
Avalanche Snow Foam - Thick, citrus-infused foam cleaning agent which lingers on surfaces and works its way into panel gaps to safely remove bonded contamination without degrading protection layers.
Lather Car Shampoo - Protection-layer-safe car shampoo containing an advanced blend of surfactants and lubricants specially formulated to lift and encapsulate grime for the safest possible contact wash.
Caramics Enhancing Shampoo - Powerful blend of surfactants and lubricants used to lift and remove grime. Contains an infusion of Si02 to boost and enhance previously applied ceramic protection.
Crystal Glass Cleaner - Finely balanced, distilled solvent solution that's safe to use on all glass surfaces and designed to cut through grime, sticky contamination and greasy films.
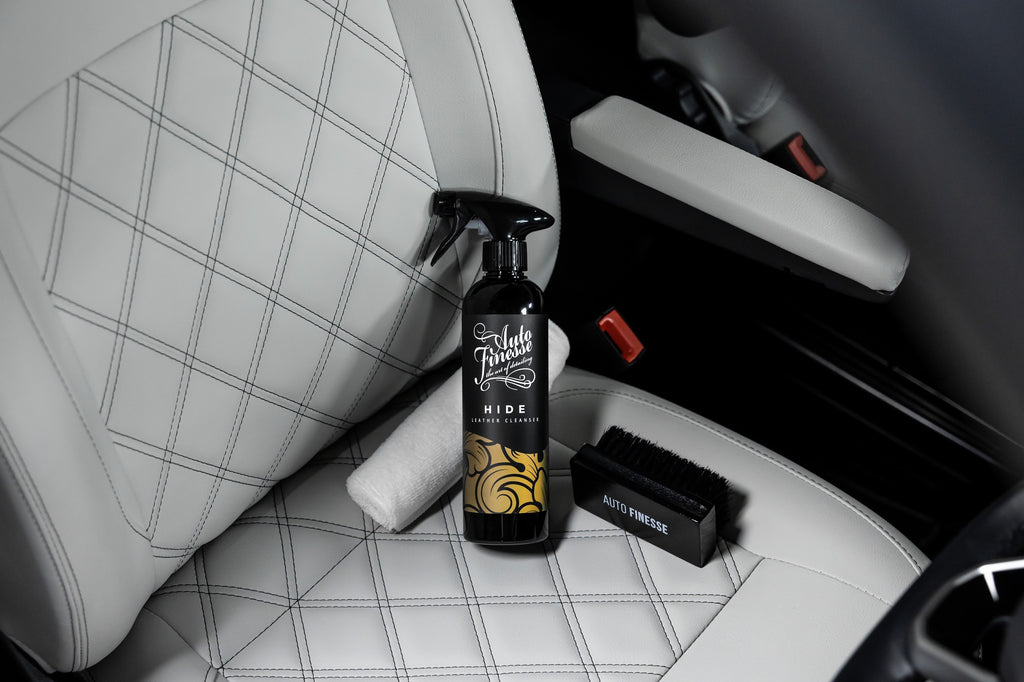
Total Interior Cleaner - Powerful Interior Cleaner capable of removing stains, spills and ground-in grime. Safe for use on all materials including carpets, upholstery, leather, plastics and rubber.
Spritz Interior Quick Detailer - Interior cleaner and finisher specifically for hard plastics and vinyl. Contains UV inhibitors to prevent fading and anti-static agents to limit future dust build-up.
Finishing/Protection:
Satin Tyre Crème - Progressive tyre dressing allowing you to decide on the level of shine. One application gives a subtle, satin sheen and multiple applications give a wet-look gloss. Also contains UV inhibitors to protect against fading and browning.
Lavish Ceramic Foam - The simple and effective solution for topping up the life, and improving the performance of, ceramic coatings. Si02-based formula applied with your snow Foam Lance, to add gloss and protection during the wash stage.
Mercury Xtreme Metal Polish - Heavy hitting cleaner polish used to bring back the factory shine on bare metal surfaces, such as heavily contaminated exhaust tips and polished wheel lips.
Accessories:
Snow Foam Lance - Designed for Snow Foam/Ceramic Foam application, a professional Foam Lance activates the cleaning agents and whips up the solution into a thick, lingering foam.
Detailing Bucket x3 - High 20L capacity and removable grit guard cuts down the risk of harmful particulate recirculation back to wash media. For the safest maintenance we recommend separate buckets for wheel cleaning and your shampoo solution, along with an additional bucket for rinsing media during the contact wash.
Plush Wash Mitt - Designed to glide across surfaces during your contact wash, picking up and trapping potentially harmful particles deep within the material and away from paintwork.
Noodle Wash Mitt - Microfibre wash mitt with ultra plush fibres designed specifically for getting into recesses and holding onto heavy grime. Ideal for safely cleaning dirtier or more awkward vehicle areas.
Detailing Brush Trio - Set of 3, scratch-free Detailing Brushes useful for safely agitating a range of cleaning solutions in and around the vehicle.
Barrel Brush Wheel Brush - Long-reach, scratch-free wheel cleaning brush specifically designed to access wheel barrels and awkward areas such as behind spokes.
Feather Tip Brushes - Super-soft detailing brushes, ideal for agitating cleaning agents on the most sensitive surfaces.
Upholstery Brush - Essential for agitation of interior cleaning solutions and for deep-cleaning fabric convertible roofs.
Rubber Scrubber Tyre Brush - Stiff bristle brush used for agitating tyre cleaners and helping to remove harsh, embedded grime.
Silk Drying Towel - Highly absorbent, twist-loop microfibre essential for absorbing rinse water (along with any impurities contained within) from all surfaces after completing the wet work.
Ultra Plush Microfibre - Ultra-absorbent microfibre towel, ideal for many finishing tasks and also useful for drying complicated alloy wheels.
Superior Waffle - Designed specifically for use with spray-on glass cleaners, the waffle weave material has been specially developed to pick up and trap particulates and sticky residues.
Tyre and Trim Applicator - Contoured soft-foam applicator designed for easy application of tyre and trim dressings.
Microfibre Work Cloths - 300GSM general-use microfibre cloth, suited to a huge variety of cleaning, polishing and finishing tasks.
Ultra Soft Wash Mitt - Super-soft lambswool mitt, ideal for use on any sensitive surface, including paintwork and specialist wheels.
Pressure Sprayer - Used for the dilution and application of pre-cleaners and wheel cleaners.
Kneeling Pad - Designed to take the strain off your knees when kneeling to clean your wheels and other lower sections of the vehicle.
Generally speaking, routine maintenance is the bread and butter of detailing, and it's important for various reasons… and not just because no one wants a dirty car.
Many contaminants found on the road such as salt, traffic films, insect splatter, bird droppings and often general grime, not only contain large particulates that can abrade paintwork and protection layers, but they can also be highly corrosive. This means that, over any extended period, they may cause damage to surfaces. Some contamination in the air (or produced by the vehicle itself) such as oil-based deposits, brake dust and other metal contamination is particularly harmful, even on a vehicle that's fully protected. Regular maintenance simply ensures that contamination isn't on the most sensitive surfaces long enough to cause significant damage. It also gives you an opportunity to top up protection, enhancing the performance and durability of any previously-applied barrier layers.
A maintenance wash takes care of a vehicle's cleanliness - inside and out - as a kind of interim detail between more in-depth, time-consuming details that may be carried out once or twice a year. Although you can add in other processes if you choose, generally routine cleaning doesn't require other detailing stages such as paintwork decontamination, polishing and deep-cleaning of engine bays, you can however choose to top up any kind of protection once the surfaces are free from harmful contaminants. When it comes to the protection that's already there, it's also important that the products you choose during maintenance don't degrade these layers as you clean.
Assuming that the correct products and safe wash techniques are employed, the frequency of maintenance isn't as critical as many are inclined to believe. While it's true that making contact with the most sensitive vehicle surfaces during the wash stages is where damage is most likely to be incurred, the risk is eliminated when utilising the professional process outlined in this course.
Of course, some will recommend limiting your washes to, say, once a fortnight, or performing less cleaning over winter (because the vehicle tends to be dirtier, so there's more risk involved with the heavier particulates) and with some traditional wash methods - particularly those using cleaning products and equipment that may not be up to detailing standards - this point is valid. But, if the task is completed safely using the correct products and processes, nowadays you can wash your car without significant risk anytime you feel that it needs cleaning.
It goes without saying that there are several factors (such as the weather, vehicle size, and current protection) which can affect how much of your time a maintenance wash will take. But, generally speaking, we would normally expect routine maintenance to take anywhere between 1-3 hours.
It is also important to note that you should always avoid washing your vehicle in direct sunlight or in extremely warm weather. In our experience the best times to perform your wash are first thing in the morning or on a relatively mild evening, at the very least use an area that's as shaded as possible.
These timing precautions are essential to avoid premature drying of both cleaning products & rinse water- as this stops the surfactants they contain from doing their job of breaking down and lifting contamination, and rinse water can create some hard to remove water spots.
Tap water - the water you're likely using to clean your vehicle - isn't pure, it will contain a percentage of mineral impurities and other hard deposits. Technically you'll always be rinsing your car with another solution - a mixture of pure water, minerals and other trace contaminants. Here in the UK the tap water is some of the purest available, but that doesn't mean that it doesn't contain traces of limescale, fluoride, lead, micro plastics, aluminium, copper and more. Of course, there's also the chlorine that's used to purify it in the first place. If your water is allowed to dry on the vehicle, the pure water molecules will evaporate off, leaving behind the impurities. The mineral deposits in particular are what cause water marks, and some of these can even scratch when dragged across surfaces.
The basic solution is not to leave water or your other cleaning agents to dry naturally, to avoid leaving any foreign particles behind. This is why we always keep the vehicle wet all through the wash stage, until we're ready to remove any surface water and impurities together by directly absorbing from the surface with a drying towel. This is also why we start with the wheels first before soaking the body of the car, so we don't have to stress about keeping it wet during the wheel clean,
Hot weather and hot surfaces created by recent driving and braking make avoiding premature drying almost impossible. This is why many professional detailers and valeters often take extra precautions by using a canopy or filling their mobile detailing tank with pure de-ionised water, just because they can't pick and choose when they are cleaning cars during the day.
Every detail (with the exception of those that include deep-cleaning the engine bay or chassis) begins with cleaning the wheels and tyres, simply because this tends to be the dirtiest area of any vehicle. By cleaning the wheels and tyres first, we eliminate the risk of premature drying and leaving watermarks on other more sensitive parts of the vehicle.
The first stage is product preparation, and we begin by filling a Detailing Bucket three-quarters full with plain water, and then adding 2-3 two capfuls of Revolution Wheel Soap. To ensure that we get sufficient suds and an active foam from our shampoo solution, we fill the remaining quarter using our pressure washer lance.
We clean wheels one at a time, and before making any contact with any cleaning agent, we rinse the wheel and tyre thoroughly. This is immediately followed by flushing out the inner arches, before moving back to the wheel for a final rinse down.
The reason we rinse each wheel for a second time (after completing the inner arches) is because any heavy grime flushed out from underneath will inevitably drop down onto the wheels and tyres, particularly inside the barrels. The whole process is specifically designed to remove any heavy, loose contamination, saving your cleaning agents for where they're most needed. This measure prevents you from wasting your products on contamination that can easily be removed without them.
The next process is where your wheel cleaners come in. In our case we have reasonably-tough, clear-coated OEM wheels, so we'll be using Imperial Wheel Cleaner and brushing it in using our Revolution Wheel Soap solution. This stage not only makes use of the cleaning power of both products for intense grime and brake dust removal, but also utilises the lubrication properties of Revolution to help potentially harmful particles slip and slide freely over, and off, the surface.
For the most sensitive finishes - such as bare metal and unprotected chrome wheels - Revolution can be used as the sole cleaning agent.
Apply Imperial liberally to the whole wheel, being sure to get plenty inside the barrels. Allow to dwell without letting the solution dry out, for around 2-4 minutes. This will allow the product to get to work breaking the bonds of any baked-on contamination, lifting and encapsulating harmful particles safely in the solution.
Once the dwelling is complete, we can agitate the solution by brushing in with our Revolution solution. Here the agitation isn't so much to physically scrub away the grime, but to ensure maximum contact with all areas, and to refresh any spent solution with fresh product.
Many cleaning products that are safe to use on cars - including those that we use on wheels - are classed as aqueous cleaning agents, meaning that they use a combination of water molecules and special cleaning molecules called surfactants to physically pull particles away from surfaces. Once broken free, the surfactants surround them, suspending them safely in the cleaning solution, allowing them to be rinsed away. This mechanism takes place on a microscopic level and there's only so much grime that each of the millions of surfactant molecules can encapsulate before that portion of the solution is essentially full up. This is what we mean when we say the solution is spent. Agitation makes your cleaning products more effective by moving away the spent solution and replenishing the area with fresh solution to work on any grime that's left over. This is why dirtier surfaces tend to require more product and more agitation.
With wheels, we start the agitation process on the barrels and between the spokes using a Barrel Brush, which has been specifically designed to slip in and make maximum contact with these areas. Dip your barrel brush into the Revolution solution and agitate.
Once every part of the barrel has been agitated, we move on to using a dedicated wash mitt to agitate our solution into the faces and around the spokes. When we say a "dedicated' wash mitt, it means that we always keep any mitt used on wheels separate to the mitt we use to contact wash later. This is to prevent the risk of transferring harmful particles, such as grit and brake dust, to the more sensitive areas of the vehicle.
For the most intricate dirt traps around the wheel, such as cleaning around the wheel bolts and between the tyre and rim, we opt for a scratch-free Detailing Brush to agitate our solution. This accessory is ideal for gaining access to the areas that your Barrel Brush and wash mitt cannot reach. Once again, dip into the Revolution solution and apply liberally.
Before rinsing away our wheel cleaning agents, we can give them a little longer to work on the hardiest contamination while we clean the tyre and inner arch. Again, these tend to be extremely grimy areas which require a heavy hitting cleaning agent like Tread Tyre Cleaner.
Apply your Tread liberally over the sidewalls and plastic inner arches, and don't be concerned if there's a little overspray onto the wheels, this will not do any harm. Tyres and arches won't be damaged through scrubbing either, so we can agitate the solution vigorously using stiffer brushes designed to mechanically clean (or physically remove) the most ingrained grime. For sidewalls we use a Rubber Scrubber Tyre Brush, before moving on to an Arch Blaster Arch Brush (or a Barrel Brush) for the inner arches. When scrubbing these areas be careful to avoid any contact with the wheels or the paintwork.
Top Tip: When cleaning arches our go-to accessory would usually be an Arch Blaster but, if your car is lowered or has minimal clearance in the arches, you may have difficulty getting one in there. If this is the case, our backup option is always to use a Barrel Brush instead.
To finish we rinse the whole area thoroughly. By now all the cleaning agents will be encapsulating the harmful contaminants, so this process will ensure that they're fully removed from the vehicle. Once again, start with the wheel, move on to the tyres and arches, and return to the wheel for a final rinse down.
Once all four wheels have been completed, you can move on to the Pre Wash stage.
The pre wash stage has been described as the most important process by many a professional detailer. The purpose of this stage is to remove as much of the harmful grime and heavy particles as possible before we make any contact with the bodywork. If you skip the pre wash you risk inflicting defects by dragging these harmful particles across the more sensitive surfaces of your vehicle.
We start this stage by rinsing the whole vehicle with a pressure washer to remove any loose surface dirt. Once again this ensures that you're not wasting product on grime that can be easily removed, saving your cleaning agents for where they're needed most. Be sure to not only rinse down the exterior, but flush out any shuts and panel gaps, too.
We then go around the vehicle applying our pre-cleaner, we're using Citrus Power Bug & Grime Remover which is designed to lift and encapsulate the harmful particles without degrading previously-applied protection layers.
Citrus Power is supplied ready-to-use in 500ml and 1-litre triggered bottles, and in 5-litre trade size containers. We've chosen to make our lives easier by applying ours over the large area using a Pressure Sprayer, an option often preferred by trade professionals who complete multiple cars day in and day out.
Apply your Citrus Power over the whole vehicle, we recommend starting with the lower areas (which tend to be the dirtiest) to give the product a little more time to dwell. Leave your Citrus Power for around 3-5 minutes to get to work lifting the grime, the longer this product dwells the more grime it can trap in the solution, but never let it, or any other cleaning product, dry on the vehicle.
After sufficient dwelling, rinse the entire vehicle from the top down, being sure to remove any traces of product.
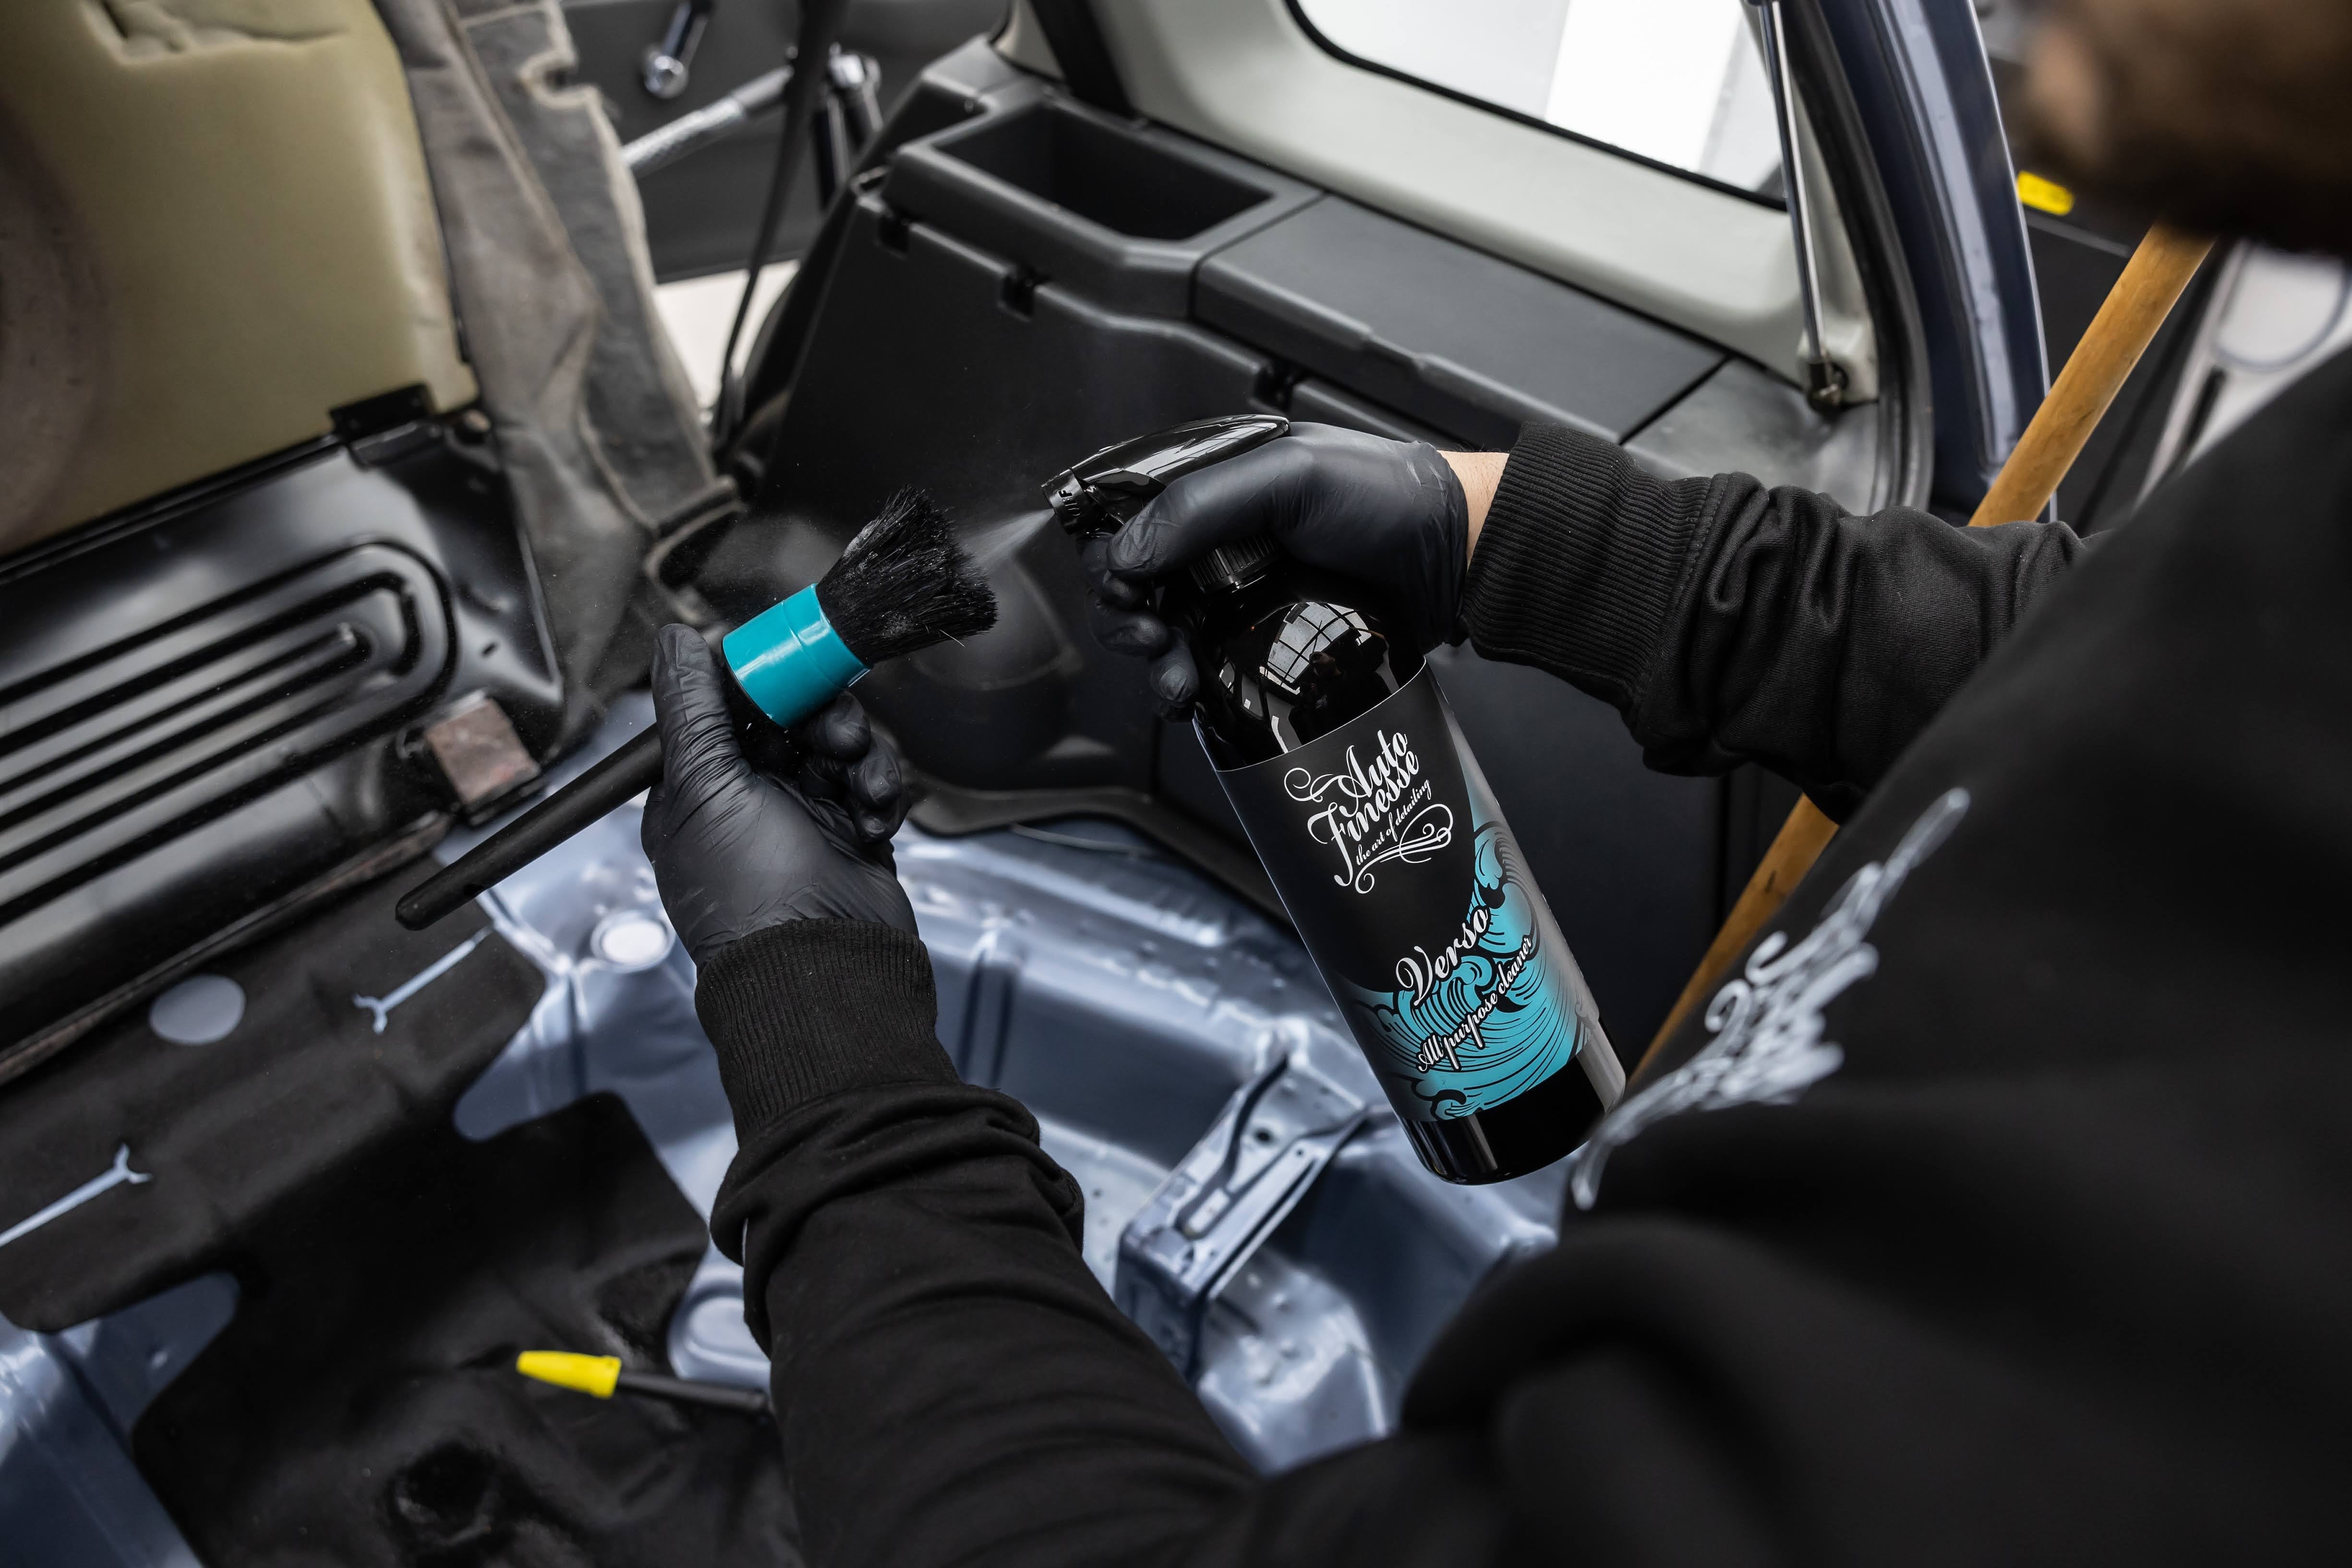
After rinsing, we can add more Citrus Power to the door jambs and boot shuts, along with other notorious dirt traps such as inside fuel filler flaps, and inner door bottoms, before agitating with a soft Detailing Brush. Unlike the exterior panels where we avoid any agitation these areas are generally safe to gently work in your cleaning agent. Once agitation is complete, rinse these areas thoroughly, and once again rinse the whole vehicle from top to bottom to ensure that all product is removed.
Top Tip: Make sure you keep an eye on the rest of the vehicle while you're agitating to make certain it doesn't dry out. If necessary always stop what you're doing and mist some water over the whole vehicle using your pressure washer to make sure it stays wet.
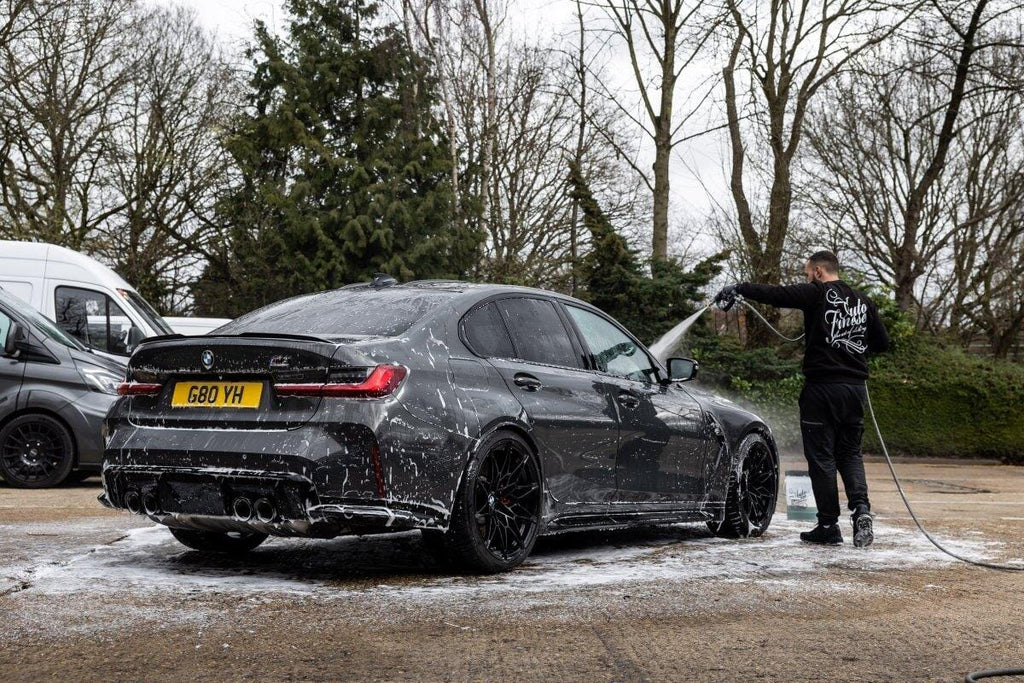
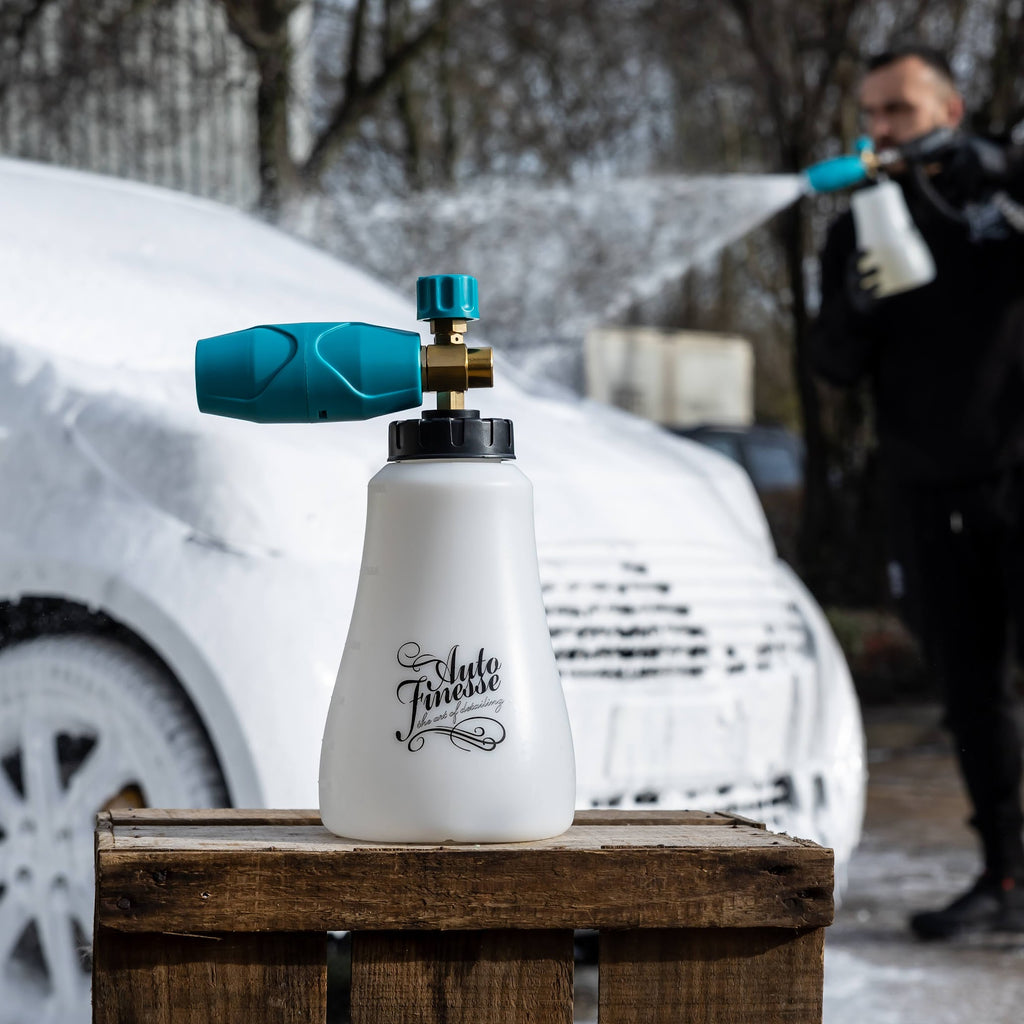
Once all traces of Citrus Power solution and grime is removed, we can move onto the snow foam stage. Snow foam is always the second part of any pre wash, the idea is to apply a thick, lingering foam which dwells on the vehicle for as long as possible to break down even more bonded contamination. Avalanche Snow Foam is a citrus-infused product that's safe on waxes, sealants and ceramic coatings, and designed to work its way into panel gaps and crevices, ensuring that all areas receive contact with the powerful surfactants it contains.
Add 1-2 inches of Avalanche to your Foam Lance Bottle and top up with clean water. You can fill slowly with a tap but a good tip is to dip the bottle into a bucket of clean water, to help avoid it foaming up prematurely.
Apply your Avalanche over the entire vehicle, including the wheels, working from the top down. There's a common misconception in detailing that bottom-up application is best for snow foams, but in reality, this risks dragging the heavier soiling usually found on the lower areas upwards to cleaner parts of the vehicle. For this reason, we always recommend applying snow foam from the top.
Because the missed harmful gritty particles will have been removed earlier with your pre-cleaner, Avalanche Snow Foam can be lightly agitated, to ensure maximum contact, on targeted dirt traps around the vehicle. For this process we always opt for a super-soft FeatherTip brush to work on intricate areas such as grilles, headlights, rubbers and weather strips. However if you are using Avalanche Snow foam as your only pre-cleaner we advise against agitating.
Snow foam is designed to be left to dwell for as long as possible before rinsing, but even so, never let it dry naturally. A good professional tip is to keep an eye on the windows, as these tend to dry out first. Once the windows start to dry out it's time to rinse the vehicle from the top down, being sure to flush out any panel gaps and shuts. Once all traces of foam are removed, that's your essential pre wash complete.
As this specific vehicle has been protected using our Caramics range of exterior ceramic coatings (Paintwork, Glass and Wheels) within the last six months, we can opt for our Caramics Enhancing Shampoo for the contact wash stage. This product is designed to clean surfaces, just as you'd expect, but it's also infused with an Si02-based coating designed to boost the life and performance of any previously-applied ceramic protection.
When a wax or sealant has been applied previously (or if we don't know the history of the vehicle), instead we'd opt for Lather Car Shampoo, which is a pure cleaner that contains no waxes, coatings or shining agents. This detailing staple is safe to use on all protection layers, including ceramic coatings, when boosting protection isn't desired. Both Lather Car Shampoo and Caramics Enhancing Shampoo are dilute-to-suit products, meaning that you can simply add a little more to your Detailing Bucket for the heaviest soiling, and a bit less for lighter soiling.
Here we add around 4-5 capfuls of our shampoo to a Detailing Bucket that's three quarters full of water, before topping up with our pressure washer.
It's essential to use the two-bucket method when performing any contact wash. This is where you have one bucket for your wash solution, and another bucket containing nothing but plain water for rinsing out your mitt after every pass. These should be completely separate from the bucket that you use to clean your wheels. We recommend labelling each bucket to ensure they're used for the same task every time you detail.
Professional wash mitts - like the Ultra Plush Wash Mitt we're using here - are designed to glide across surfaces picking up particles and trapping them deep within their microfibre or lambswool material. By using the two-bucket method you're ensuring that these contaminants are rinsed out of the mitt before moving back to your wash solution. This not only cuts down the risk of cross contamination of your shampoo solution, but ensures that the particles aren't dragged back onto the vehicle where they could cause defects.
Another crucial safety measure used during the contact wash is to clean the areas that are more likely to be lightly soiled first. Again, this cuts down the risk of dragging heavier particles to cleaner areas of the vehicle.
Starting with the roof, we load up on shampoo solution and pass our mitt over the surface, cleaning approximately half the area, before turning over the mitt and completing the remainder. We always wash in straight lines, rather than circular motions, to further cut down the risk of inflicting swirl marks.
After rinsing and reloading your mitt, you can turn your attention to the windscreen and bonnet, following the same process of using each side of your mitt for approximately half a panel.
Next, we move to the upper sides of the vehicle - usually the top half of the doors, pillars and side windows.
Top Tip: Most cars have what we call a "design line' halfway down the doors or so which gives a good indication on where you wash to when cleaning your upper sides. Generally speaking, anywhere below this line will be more heavily soiled and classed as the lower sides. It's a good idea to use a separate mitt on these areas, and leave them until last, to prevent contaminating any wash media you may use on the uppers or dragging any dirt upwards and around your paintwork.
Once the upper sides are compete, we can set to work on the front bumper and grille.
The rear end is usually one of the most soiled parts of any vehicle, so we leave this as one of the last stages. We start by cleaning the top portion with our Ultra Plush Mitt, and then move on to the bottom portion, followed by the lower sides, using a dedicated mitt. In this case we're using a Noodle Mitt for the dirtiest areas, which is great for trapping heavy grime and working its way into the more intricate parts like around side skirts and exhausts.
Finally, to complete the contact wash, we can rinse the vehicle thoroughly from the top down.
This is, of course, an optional step and one that's only performed on vehicles with a previously-applied ceramic coating or no protection at all. When topping up other protection layers, such as waxes or paint sealants, this should always be carried out after drying the vehicle.
Ceramic coatings are unique because they use silicon dioxide (otherwise known as silica) to chemically bond to surfaces and create a glass-like layer of gloss and durable protection. These can be topped up or installed during the wash stages, while the vehicle is still wet, using Lavish Ceramic Foam.
Lavish is designed for easy application using your Snow Foam Lance. This product is a simple spray-on-and-rinse formula to boost the life and performance of paintwork, glass and wheel coatings. It's so powerful in fact, that it can install a coating on its own that repels water and grime for up to 6-months.
First add 2-3 inches of Lavish concentrate to your Foam Lance bottle and top up with water.
We then apply the Lavish to the entire vehicle. This product bonds instantly so there's no need to leave it to dwell. Instead rinse off immediately, ensuring that all the foam is removed. And that's your top up complete - it really is that easy.
Lavish falls into the ceramic coating family but has been transformed into an easy to use ceramic snow foam, a ground-breaking innovation in the science of SiO... See product details More
The drying stage may be simple but it's no less vital. Regardless of the type of detail you're carrying out it's essential to dry any vehicle after washing to avoid water impurities being left on the exterior surfaces. Rather than trying to push the water off the surface, the only safe way is to dry through absorption, soaking it up (along with any impurities) using a microfibre drying towel. In this case we've opted for our Silk Dying Towel for sheer speed, but the towel you use is down to personal preference, we also have our ultra-absorbent Aqua Deluxe Drying Towel, and a larger version called the Aqua Deluxe XL.
When it comes to effective drying, it's important to let the towel do all the work. Pass it over the vehicle without any pressure to cut out the risk of causing any swirling. Start with the roof and glass, before moving onto the bodywork, drying from the top down.
Be cautious of any missed grime on lower areas of the vehicle and, of course, always avoid the towel making any contact with the floor. If your drying towel does happen to touch the ground, our advice would be to dispose of it and not to use it again. In our eyes it's really not worth the risk of inflicting any damage to your paint from grit that may have been picked up.
Once the bodywork is dry you can then proceed to drying your wheels, along with the door jambs and boot shuts. You can use your drying towel for this job, but to eliminate any risk of dragging your towel across the floor, we recommend swapping to a smaller microfibre cloth to complete the drying process. Our Ultra Plush Microfibre is our product of choice here because it's far more absorbent than any other standard-size microfibre.
We start the interior clean by working our way from the back to the front of the vehicle. Starting with the boot first, remove any loose items in the interior of the car and set to one side.
Use a vacuum cleaner with a nozzle attachment, whilst holding the hose between your legs. Our go to starting point is always the parcel shelf inside the boot area.
Afterwards, we move onto vacuuming the carpet of the boot area itself. Before we attempt to tackle the front of the vehicle, we will always aim to complete each area of the interior clean a section at a time. For example, 'the boot area' would be considered as one section. This would include the parcel shelf, the boot floor, the rear glass, and any interior plastics before we move on to the cabin.
The idea here is once everything is done, we will have no need to revisit the area.
We then use Total by spraying onto the plastic trim and working it in to the area with a clean microfibre cloth.
Once you are happy with the boot area we can then look to move forward to the inside of the front of the vehicle.
Starting with the passenger side we want to work from back to front again. As the Scirocco is a three door car, we move the front passenger seat all the way forward for easier access to the rear, and remove the rear mats.
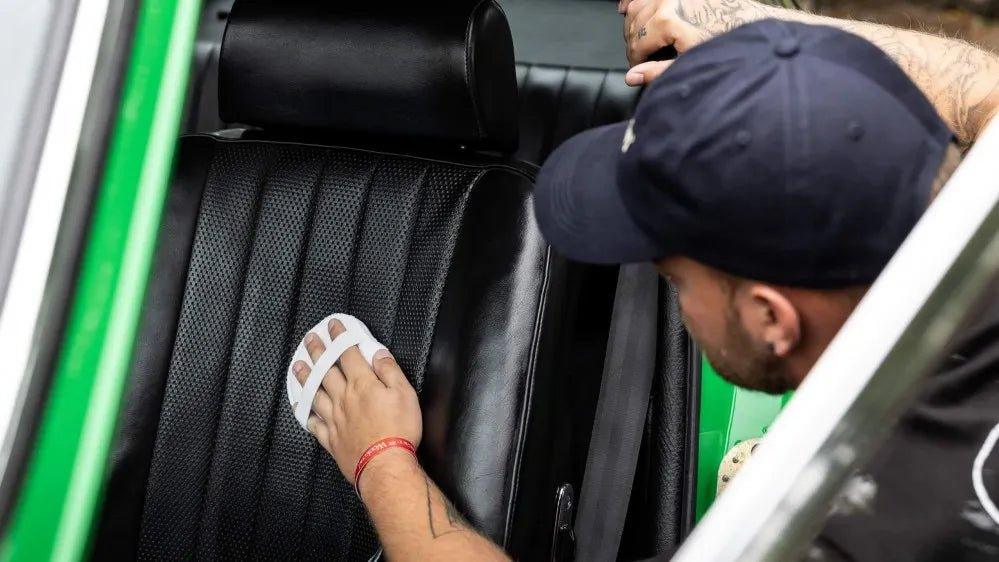
We vacuum not only the seats but also the floor area, then apply Total directly onto the seats and agitate with a clean microfibre cloth.
Once we've finished inside the vehicle, we vacuum the rear mats and place them back into the vehicle.
Afterwards, we move our focus on to the front seats and front carpets. We start by removing both mats and vacuuming the carpet floor, followed by vacuuming both seats. We then use an interior brush to agitate the dirt in specific areas; such as around the gear stick, cup holders and door pockets, with the vacuum cleaner following closely behind to pick up any debris that is disturbed.
We spray Total into any remaining areas that have stubborn dirt, followed by a wipe with a clean microfibre cloth.
Repeating this process for the dashboard, we remove any surface dirt or dust particles.
Auto Finesse Total is a ready to use car interior cleaner which is safe to use on all interior car surfaces. Whether you are cleaning plastic, vinyl rubber, cl... See product details More
Now that the interior trims and plastics are clean, we use Crystal once more to clean the inside windows. Spray directly onto the window and wipe with a Superior Glass Waffle - don't forget to repeat this process for your panoramic sunroofs and rear view mirrors too as they are commonly forgotten areas.
Top Tip: When cleaning your windscreen (or any other glass for that matter) use two microfibre cloths. One Superior Glass Waffle and another clean, dry microfibre. Flip the waffle cloth regularly and finish the windscreen by wiping with the clean, dry microfibre - no product required.
Offering the ultimate finishing touch for any detail, Crystal Car Glass Cleaner has been specifically formulated to cut through greasy films, water spots, dryi... See product details More
Use Total again to clean the clocks, dials and steering wheel, along with a spray of Spritz on the centre console and car radio. We specifically use Spritz as it's anti static so will prevent dust sticking to the surface going forward. When cleaning the radio, we spray directly onto a microfibre and then wipe it onto the radio screen, this is to prevent any overspray in more intricate areas.
Auto Finesse® Spritz is the perfect interior dressing for those times when you simply want to maintain that factory fresh interior finish of a brand new car. S... See product details More
We can then move our attention to the pedals - again, another commonly forgotten area. We place a used microfibre cloth under the pedals to catch any dripping dirt, then proceed to spray the pedals with Total and agitate the product in with an interior brush. Once it's worked in, you can use a clean microfibre to remove any remaining residue.
Finish off by vacuuming the front mats and placing them back into the vehicle. Your interior clean is now complete! Now we have finished with the interior, we should avoid any unnecessary entering or exiting the vehicle to prevent the carpeted areas getting dirty again.
To finish off our maintenance wash, we use Crystal on all exterior glass. As we did with the interior glass, we spray directly onto the glass and wipe with a Superior Waffle.
Developed as the ultimate glass cleaning towel, the Superior Waffle is the ideal product for the fastest cleaning on all interior and exterior glass surfaces,... See product details More
To dress the tyres, we add Satin Tyre Crème to a Tyre & Trim Applicator and apply directly to your tyre walls. It's worth noting here that the great thing about Satin is that the more product you use, the glossier the finish will be. We apply in a straight line onto the tyre applicator and proceed to work the product into the tyre sidewalls.
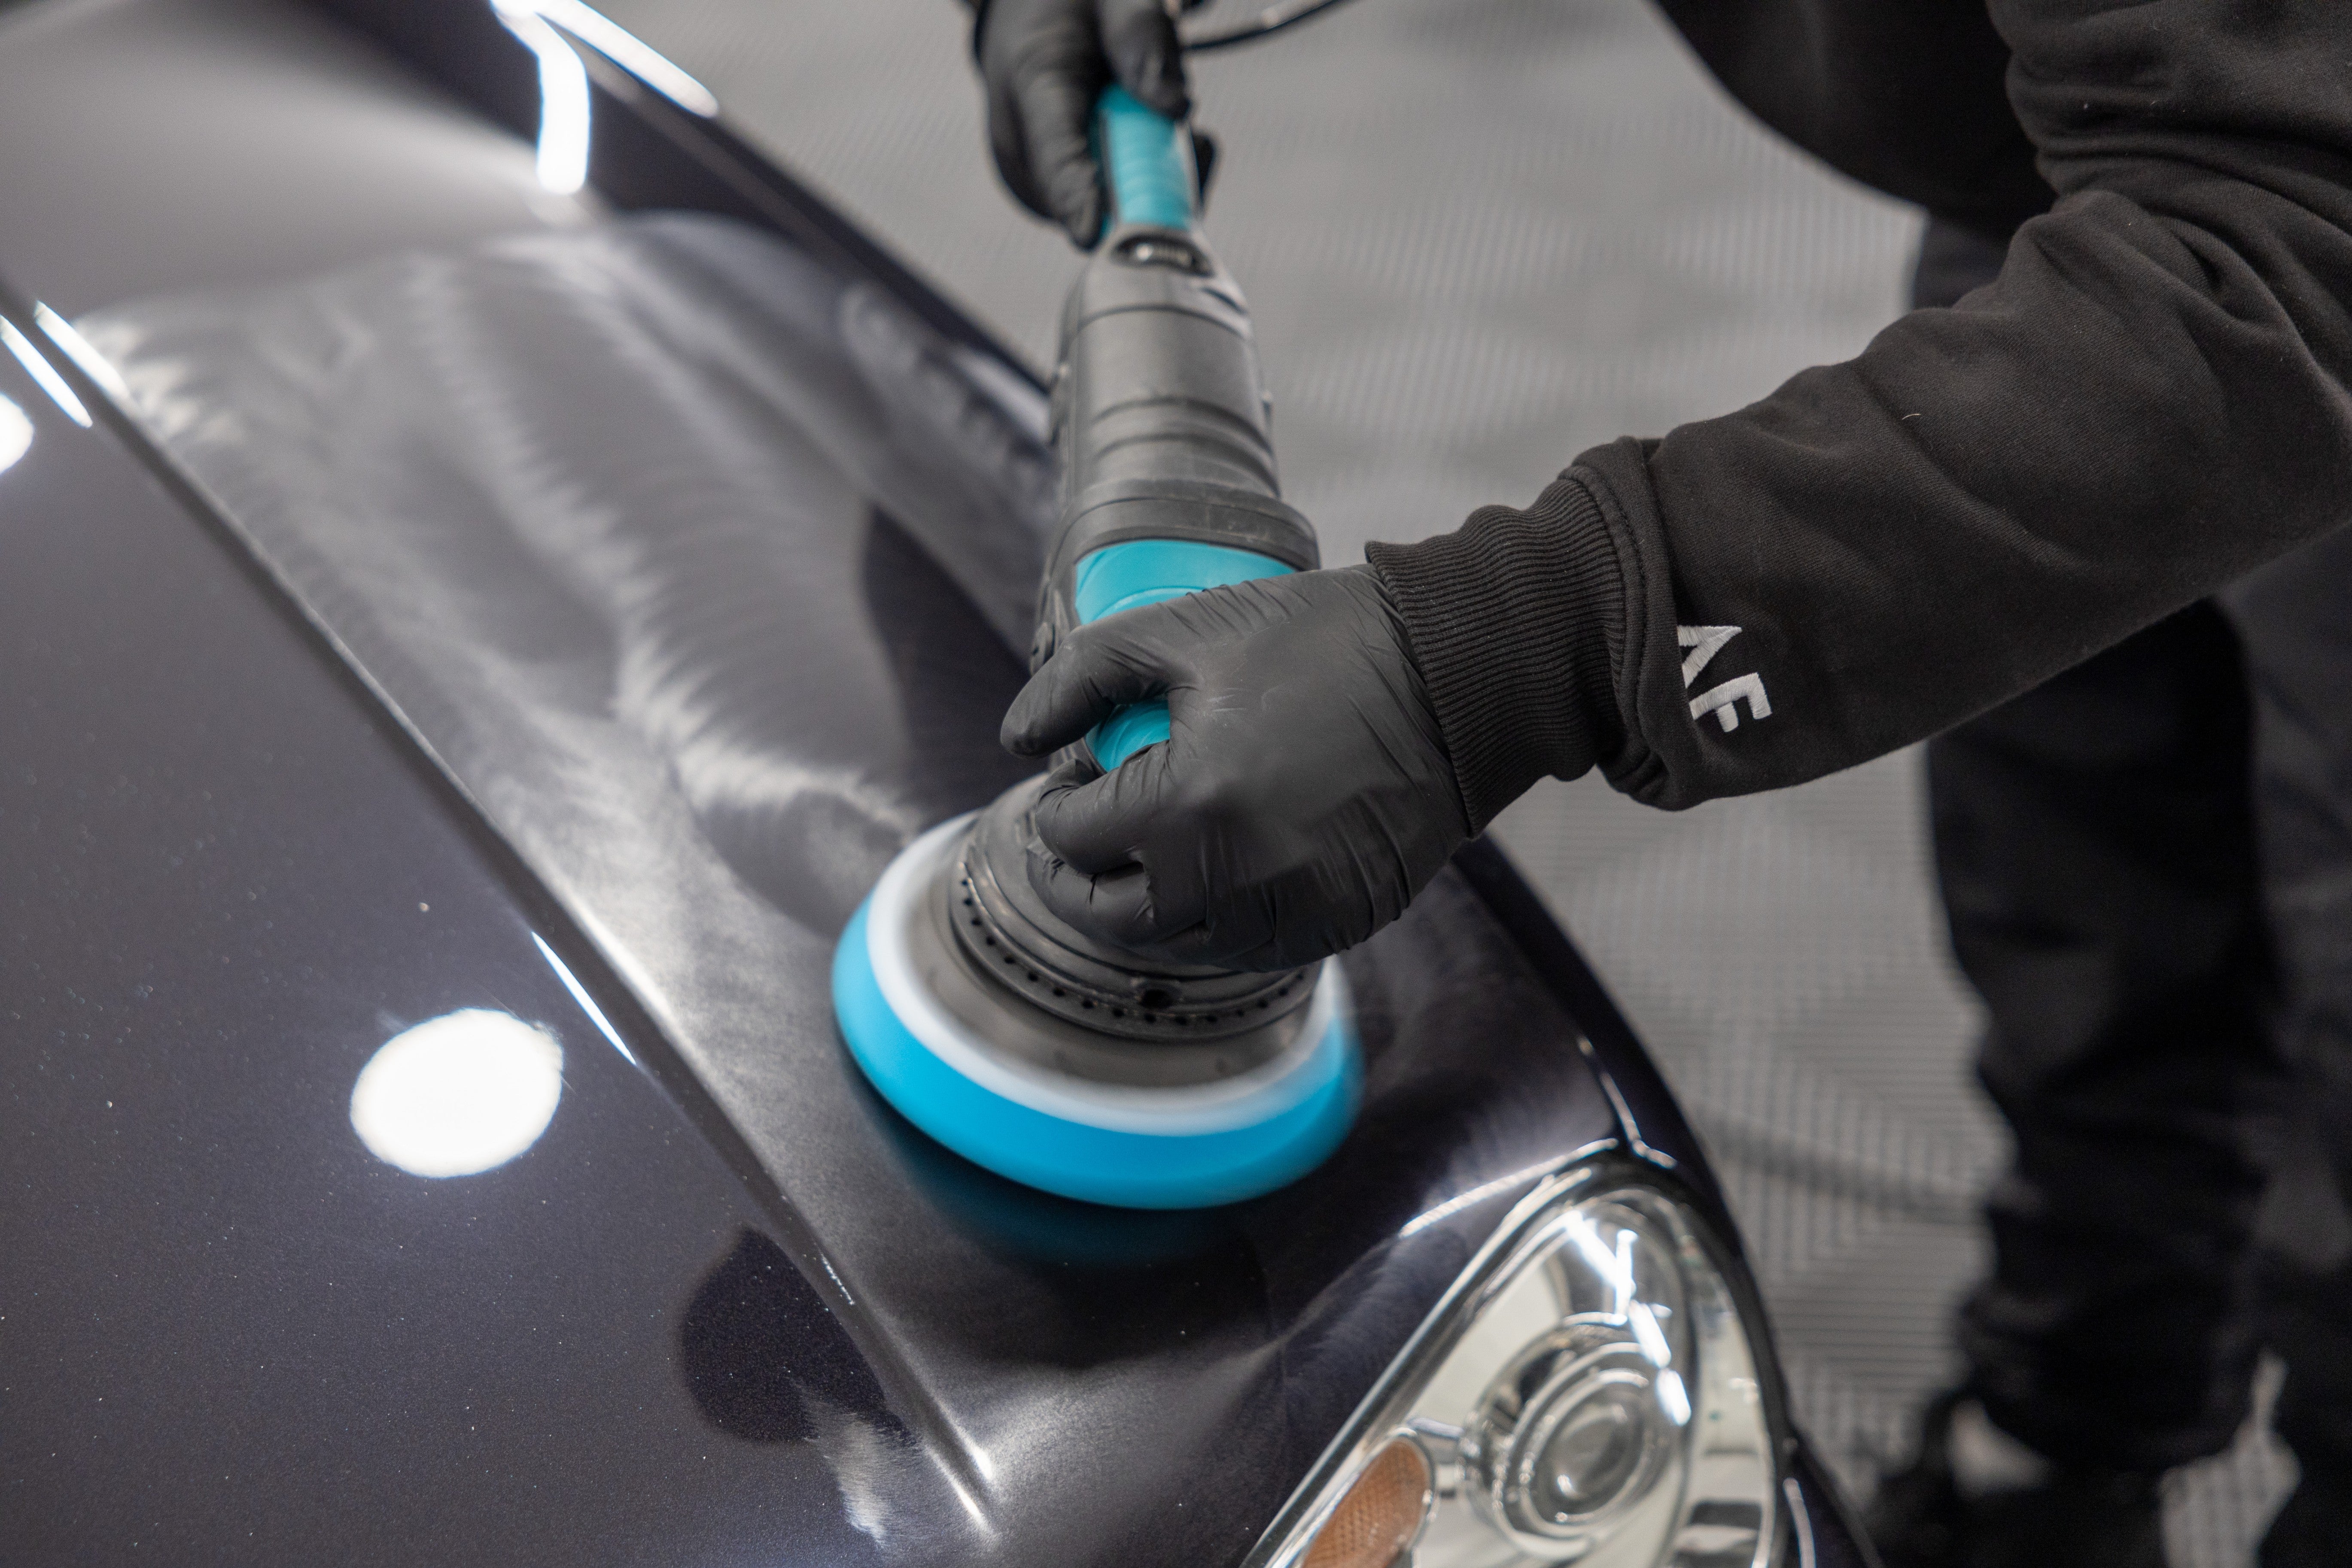
Finally, we use Mercury Extreme on a clean microfibre cloth, then apply directly onto an exhaust tip. In a back and forth motion with pressure applied, we work the product into the exhaust tips until the product is no longer visible.
Once we have fully worked the product in, we can wipe the tips clean with a clean microfibre - the results speak for themselves! For heavily soiled exhaust tips this is not an easy process and requires a lot of elbow grease. It can sometimes take a few passes to achieve results that you're happy with so don't be afraid to repeat this step over and over until you've achieved your desired results. Here's how our Scirocco tips looked before and after just one pass..
Mercury Xtreme is a heavy-hitting metal polish that’s capable of taking on the toughest tasks on any bare metal surface. Packed with advanced abrasives, this n... See product details More
And that's it! Your maintenance wash is now complete.
Congratulations on completing the Driveway Warrior course!
Before you go, don't forget to have a peek at some extra resources that you can take advantage of right now to continue your learning. We have a whole selection of online resources in the Guides section of our blog.
We welcome your feedback and hope you've enjoyed the course. Don't forget to shout about your new skills and knowledge, and share your progress on Social Media, too!
If you have any questions after you go, please don't hesitate to send an email to support@autofinesse.com