50 Top Detailing Tips
A full half-century of professional tricks and tips put together specifically to push your detailing to the next level.

 Skip to content
United Kingdom

One of the most commonly-missed parts of any detail is the big oily bit under the bonnet, so following our Engine Bay Cleaning Modern vs Classic Course will, first and foremost, ensure that you never overlook your engine bay again.
While it’s true that many skip this area purely through fear of causing damage to vital vehicle components, our indepth, step-by-step training course covers all aspects of engine bay cleaning. We'll show you the best detailing products to use and take you right through the process, pointing out what to look out for, and how to keep safety in mind, no matter the age of the vehicle.
Engine bay cleaning doesn’t have to be daunting to detailers and, whether you happen to be a novice cleaning your own car, or an industry professional looking to offer even more services to your customers, we cover all the essential steps from degreasing and rinsing modern engine bays, to hand cleaning and finishing classics. Offering a whole catalogue of pro tips and tricks along the way.
Over the duration of this course, you’ll learn what products to use and where, including many specialist heavy-hitters such as Eradicate Engine Degreaser, Mercury Metal Polish and Verso All Purpose Cleaner, along with some of the most versatile products that can also be utilised on other vehicle areas for general cleaning and finishing, these include such kitbag essentials as Dressle All Purpose Trim Dressing.
We also answer the most common engine bay cleaning questions such as: What parts do I need to avoid with my pressure washer? How are modern engines already protected from the factory? Why is the underside of the bonnet always the starting point? And, How do I revive all those faded back plastics to a show-winning standard?
Our Engine Bay Cleaning Modern vs Classic Course covers every stage from the moment you lift your bonnet, right through to getting a professional, long-lasting finish on the multitude of materials you’ll find in any engine bay.
The Products – Learn which products and accessories to use for each task, and how they work together to help give your bay a new lease of life.
Modern vs Old – What to look out for on all vehicles (of all ages) to not only get the deepest possible clean, but to eliminate the risk of causing damage, too.
Preparation – How to get your bay ready for the job before you begin your detail. Learn which exposed components and parts to protect by covering, and how long to leave a hot engine to cool before you make a start.
Rinsing - Where you should be putting your pressure washer and, most importantly, where you shouldn’t.
Cleaning – Exactly where to make start, what agitation is all about, and how you can even utilise a wheel cleaning brush for the ultimate deep clean.
Finishing – How to get a professional finish on all manner of under-bonnet parts and trim, no matter what they’re made of.
A little attention to detail can go a long way and we believe all engine bays should look as good as the exterior. So let's get started with modern cars and show you how you can transform your engine bay from this...
To this...
Detailing Products
Eradicate Engine Degreaser - Powerful, high-foaming degreaser designed specifically for 'agitate and rinse' degreasing on modern engine compartments. Safe on all surfaces including bare-metal, paint, plastics and rubber.
Verso All Purpose Cleaner- Heavy hitting, dilute-to-suit all purpose cleaner and degreaser capable of breaking down heavy soiling and oily deposits ready to be wiped away.
Dressle All Purpose Trim Dressing - Water-based dressing with UV inhibitors to restore plastics and rubber, and prevent future fading.
Mercury Metal Polish – Light abrasive cleaner polish for bare metal surfaces such as exhaust tips, brightwork and engine components.
Accessories
Detailing Brush Trio - Set of 3, scratch-free Detailing Brushes useful for safely agitating a range of cleaning solutions in and around the vehicle.
Microfibre Work Cloths – 300GSM general-use microfibre cloths suited to a huge variety of cleaning, polishing and finishing tasks.
Hog Hair Brushes - Premium detailing brushes with long, scratch-free natural bristles. Ideal for safe agitation of cleaning agents.
Pro Mixing Bottle - Professional trigger spray bottle used for mixing up dilute-to-suit cleaning solutions.
Ultra Plush Microfibre – Ultra-absorbent microfibre towel, ideal for many finishing tasks including mopping up excess dressings.
As a detailer it's important to know the differences and the approach to take when tackling specific engine bays. Modern engine bays and classic engine bays are very different and will nearly always require different cleaning methods because of their design. It's also important to consider modified engine bays because, no matter their age, they commonly have exposed parts such as performance air filters or independent throttle bodies, along with various dress up parts. So, while in most cases we'd approach a modern engine bay with an overall wet cleaning method and a classic bay with more of a targeted hand cleaning method, it does vary depending on the spec of the vehicle in question.
For the vast majority of modern vehicles you'll find that the vital components are covered with black plastic trims and there are very little, if any, that are left exposed.
Manufacturers nowadays are particularly good at protecting their engines with these well-designed trim panels and utilising other protection such as waterproof electrical plugs. All this means that using a pressure washer and following a wet cleaning method is safe, and the most effective way to clean.
In most cases - discounting modified cars with specialist parts - it's rare rare that anything will need covering. But we'll still be on the lookout for areas to be avoided such as intakes, alternators, coil packs and ECUs. Even though we'll be using a pressure washer here we'll tend to mist lightly over the entire bay rather than pointing the directly at these kind of electrical components. You can of course, cover any of these areas with a plastic bag secured in place with masking tape or an elastic band if you're unsure. After all, it's better to be safe than sorry.
We also sense check all of our plugs and electrical cables to ensure they are seated correctly and are not loose; the last thing we want when cleaning the engine bay is for a connector to pop off without you noticing.
When wet cleaning as part of a larger detail, we'll always carry out this process at the very start of our car wash. This is because engine bays typically have the harshest and most oily grime to remove, even more so than your wheels. To prevent the spread onto clean paintwork we'll tackle the bay on a modern car first.
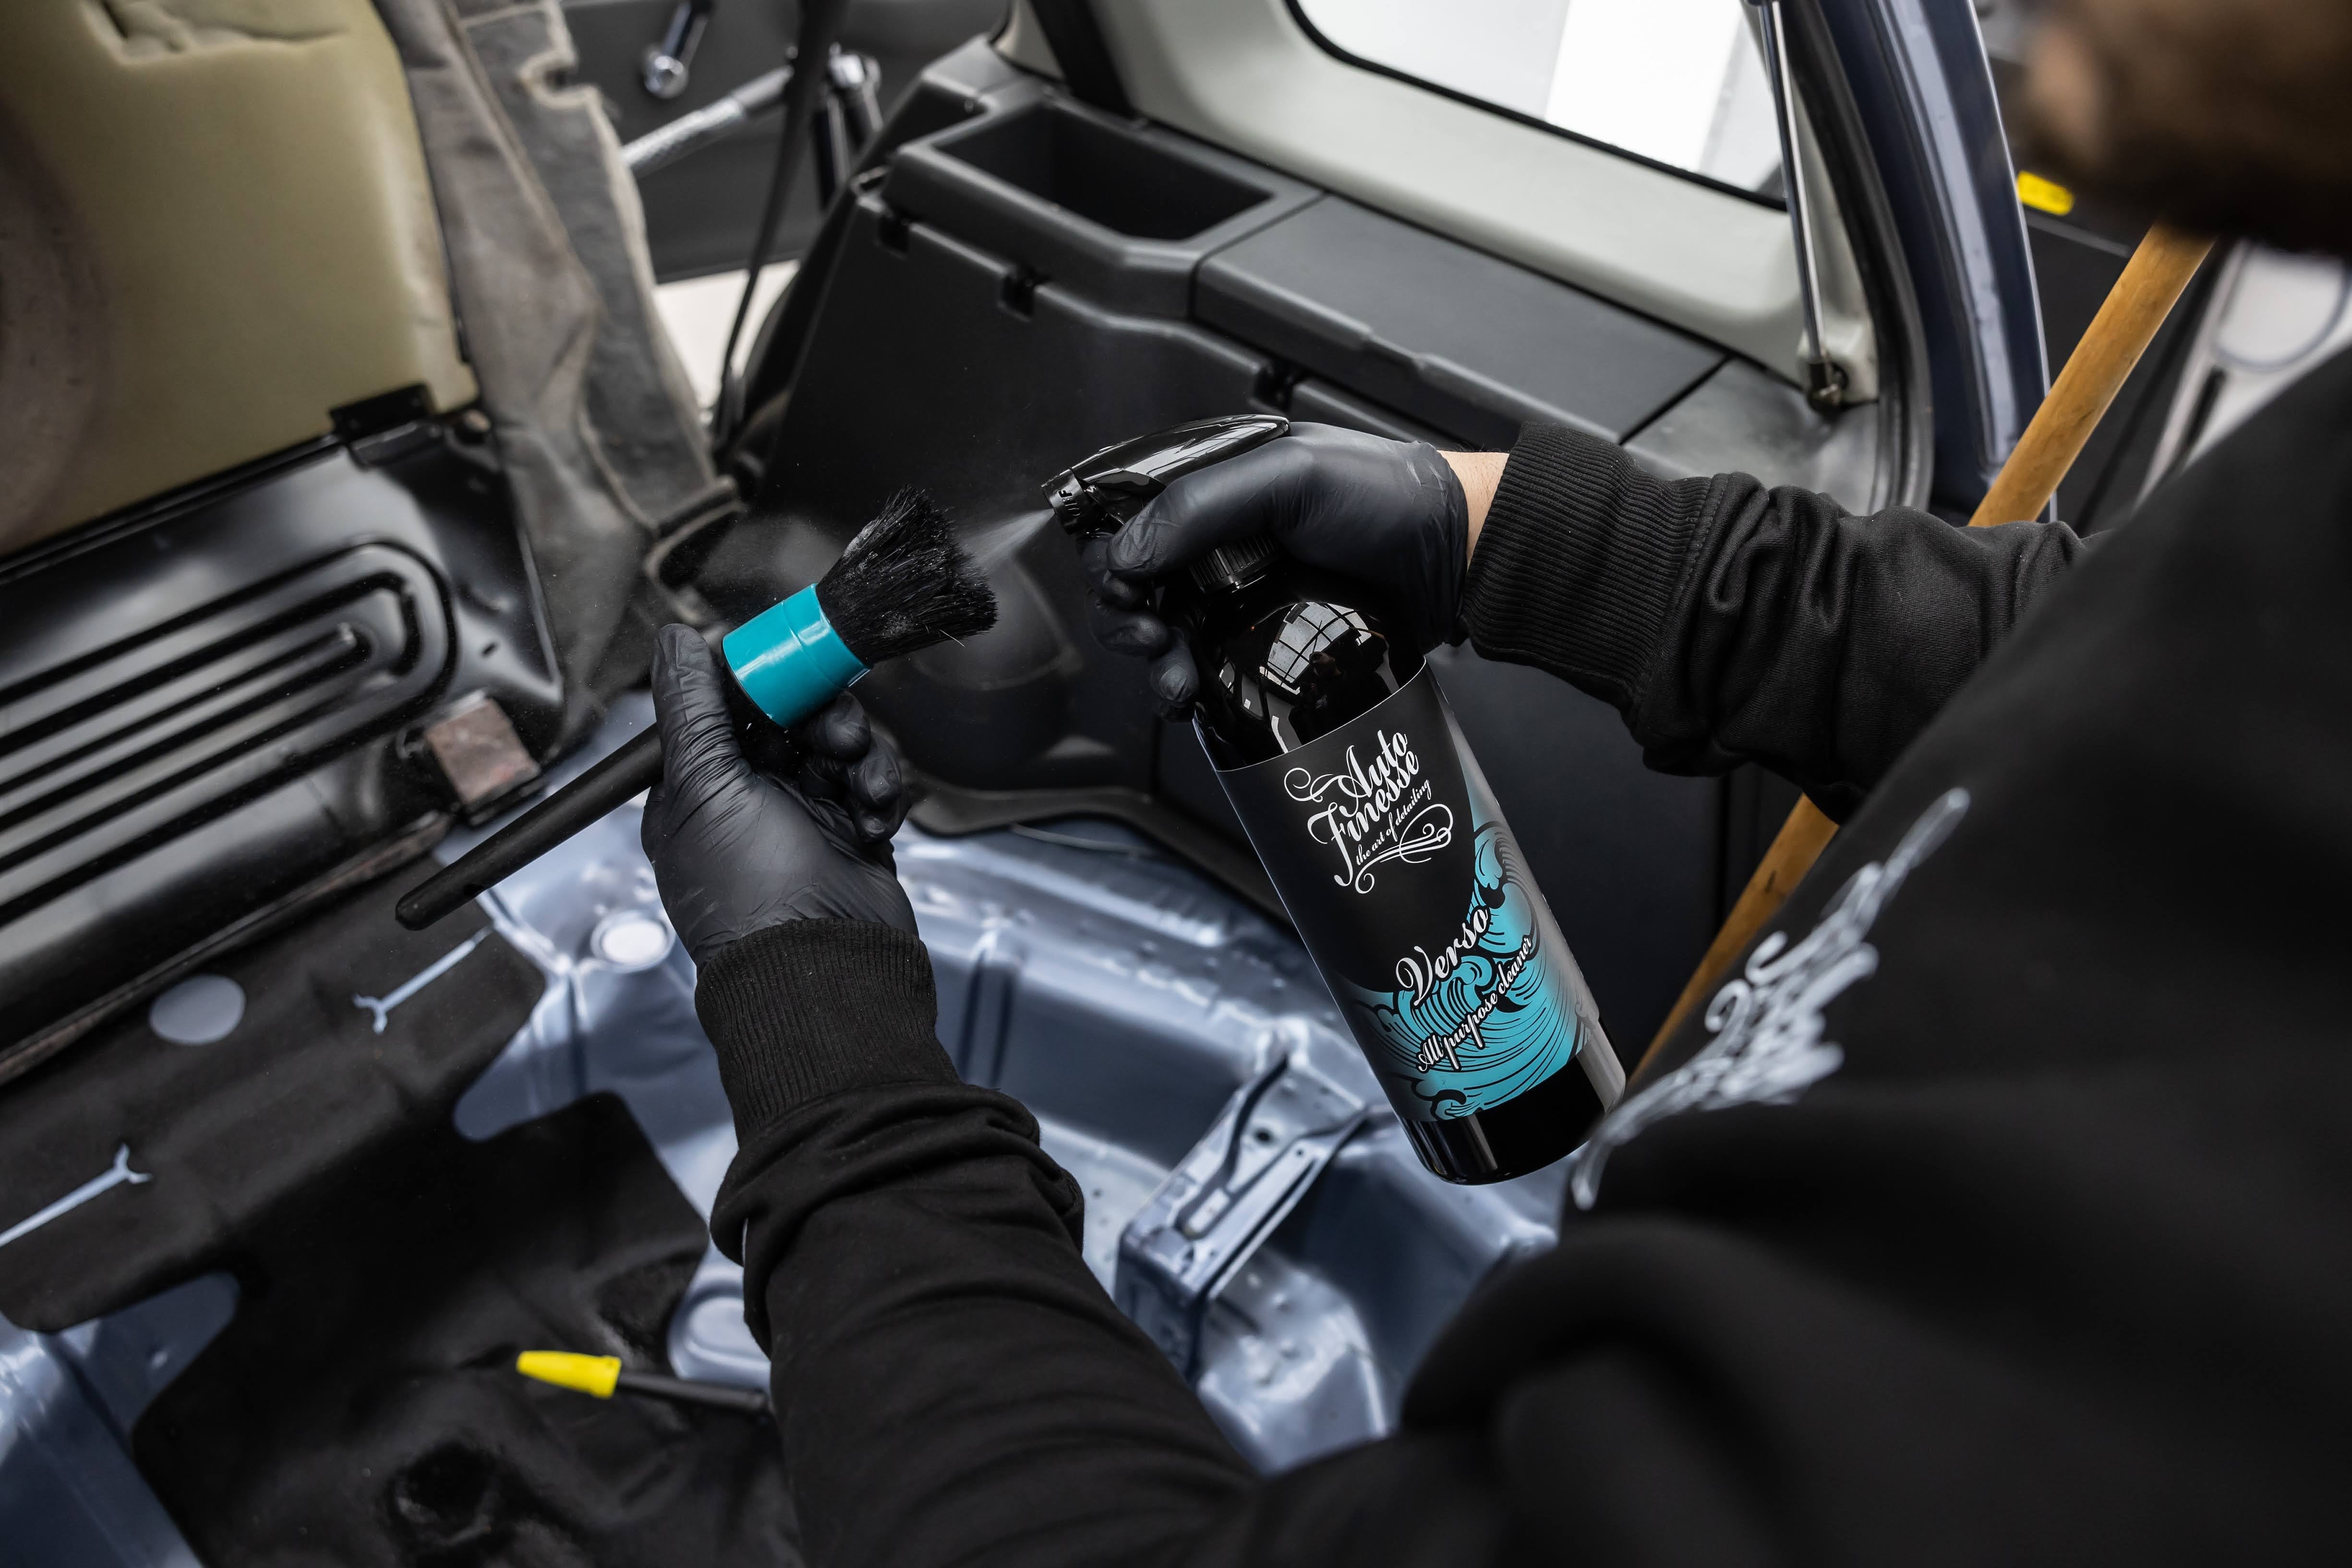
On older vehicles you're much more likely to find exposed electrics or components such as open air intakes, ignition coils and distributors. Because they tend to be very exposed, we'll avoid using a pressure washer and a wet cleaning method, and instead opt for a more targeted approach. In nearly all cases this will be a little more involved, but using a suitable dilution of Verso All Purpose Cleaner agitated with a Detailing Brush before lightly wiping away contamination is far safer than using a pressure washer for a full rinse here.
As pro detailers we may also use a steam cleaner for increased cleaning power. In these cases it helps the cleaning agent get into all the nooks, and creates a little pressure without making the surfaces too wet. But if you haven't got a steam cleaner, similar results can be achieved with your brush… it will simply take a little more time.
Often you'll find that classic cars have a range of other materials that are not found so much on modern cars. Various bare metal and alloy surfaces mean that different detailing products, such as Mercury Metal Polish can be used to make them look their best in the finishing stages.
If the engine bay clean is part of a larger detail we'll tend to leave this stage until after the car has been washed and dried. This way any wash water that has worked its way into the bay and caused any mess can be cleaned away easily.
The preparation that goes into getting your engine bay ready for a deep clean is equally important as any other cleaning stage. Engine bays will come in all different shapes, sizes and layouts, so it's important to familiarise yourself with the bay you're working on and all of its components before you start. This will help you further down the line when it comes to covering components or when you're spraying products into the bay.
Before we go any further, the first thing you need to do is to ensure the engine bay is cool to the touch. The engine can be warm, but it needs to be on the cooler side of being warm!
If the vehicle has recently been driven, it's worth letting the vehicle stand for at-least 20 minutes before even considering starting the clean as we don't want to be touching or spraying cleaning products onto any hot surfaces.
No matter the age of your vehicle it's worth taking the time to check. We always do a quick feel test before starting - if you can comfortably place the back of your hand on the engine, you can proceed...
We often see people diving straight in to cleaning the engine bay without sparing thought for the underside of the bonnet. The engine bay clean should always start with the underside of the bonnet. After all, what's a clean bay with a dirty, untouched bonnet hovering above it?
Why is it best to start with the underside of the bonnet? Rinsing the underside of the bonnet first will mean that any dirty water will fall onto the engine bay that we haven't yet cleaned. We don't want to be doing it the other way round as you'll find that any debris will fall onto your freshly cleaned engine bay and make it dirty again!
When rinsing the underside we are always cautious of any sound proofing or carpeted areas. We always advise to avoid soaking these as they will retain water and have potential to add plenty of weight to the bonnet. You don't want to run the risk of the bonnet falling down half way through your deep-clean.
We begin the pre rinse at an arms length and rinse from top to bottom. As with any pre rinse (the same as you may perform on your exterior of your car before a pre wash) the idea is to remove any loose contamination that can be eradicated by water pressure alone. This ensures that your cleaning agents can get to work on the bonded grime where they're most needed, cutting down on product wastage.
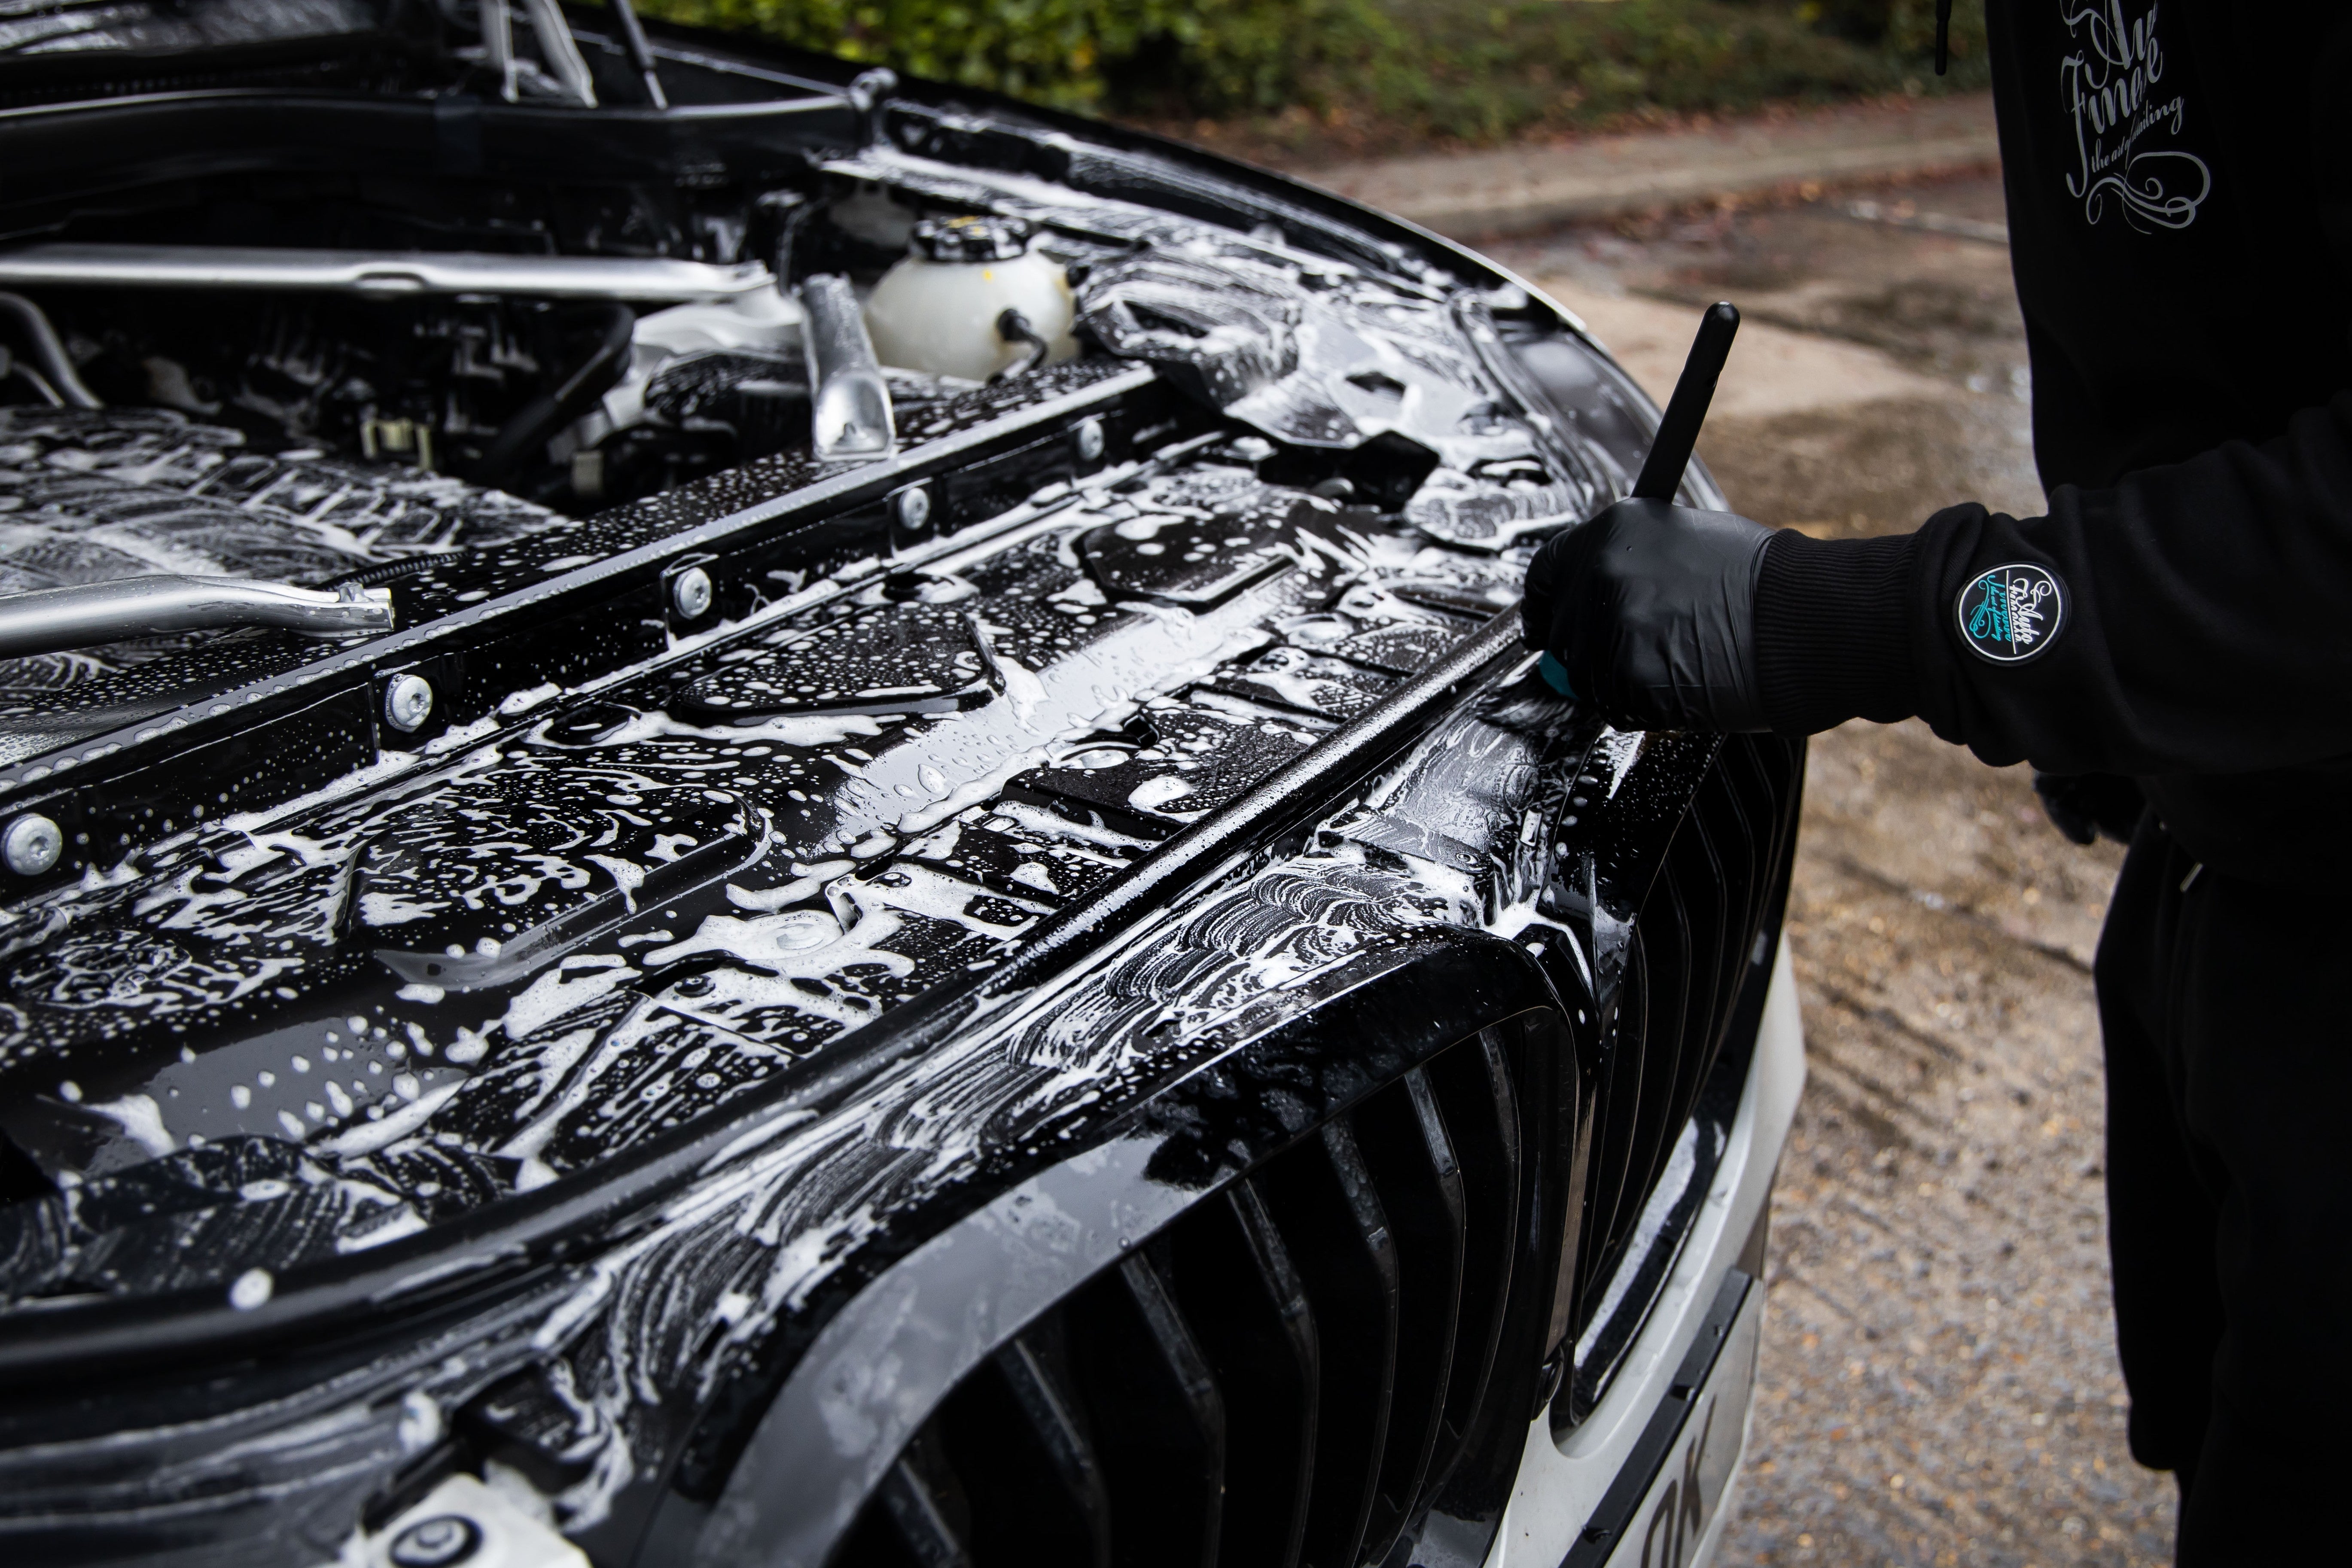
Along with general grit and grime, the most common types of contamination in your engine bay (and the underside of your bonnet) will come as oily deposits, grease and smoke or fuel staining. Contaminants of this type not only need to be pulled away from surfaces by the surfactants in your cleaning agent, but they have to be broken down first. Oily deposits are typically large, fatty molecules, this is what makes them more difficult to remove than more traditional dirt particles. A heavy-duty degreaser essentially breaks these down to smaller molecules that the cleaning part of the solution can remove more effectively. This is why our Eradicate Engine Degreaser has been specifically developed for engine bays, it’s a heavy hitting degreaser and cleaning solution designed for quick and simple ‘agitate and rinse’ application. It’s also supplied ready-to-use meaning that you can simply spray it on, agitate with your brush and rinse away the grime trapped in the solution. This makes it ideal for shifting the heaviest types of contamination.
The other key point about Eradicate – what you might say makes the process even easier – is that it’s a water and surfactant-based, making it safe to use on all surfaces including plastics, bare metal, painted metal and rubber – all the materials you’ll typically find in your engine bay. While many degreasing agents contain petroleum distillates, which can erode and deteriorate areas such as your rubber seals and hoses. Eradicate is safe everywhere and can be used on the whole area without having to target the cleaning to specific components. This makes Eradicate not only safer, but quicker too.
Degreasing the underside of the bonnet is extremely straightforward. Just spray on Eradicate liberally and allow to dwell for a few minutes while it breaks the bonds of the contamination. The only important thing to remember here is not to let the solution dry out. Technically denoted as an aqueous cleaning agent, like most products that are safe for use on cars, Eradicate needs to be wet to complete the task of lifting and encapsulating grime.
Deep clean your engine bay with this engine cleaning must have! Eradicate engine degreaser, the hard hitting grime removing engine cleaner developed specifical... See product details More
Once the product has been given time to dwell, we can then proceed to apply Eradicate directly to our Detailing Brush and agitate the solution.
Agitation in this instance isn't chiefly used for mechanical cleaning - you're not physically scrubbing the contamination away here. Agitation, as is most often the case in detailing processes, is a way of ensuring that your cleaning solution gets right into the areas where it's needed, and that the solution is refreshed - pushing away dirty residue and bringing in fresh cleaning agent to work on any remaining grime.
We work the product into the under-bonnet areas being sure to make contact with the smaller, intricate areas, until we create a foamy consistency.
Looking for the perfect detailing brushes for the detailing enthusiast? We've got you covered. We present to you the ultimate detailing brushes, complete as... See product details More
Once all of the exposed areas of the underside have been agitated, we can move on to a final rinse to remove the contamination trapped in the solution. We thoroughly rinse the underside, avoiding any carpeted areas, before assessing our work.
Check the area thoroughly and repeat the degreasing process if required. When we're happy, we can move our focus to the lower engine bay itself.
Before we start with our pre rinse we always remove by hand, or by compressed air, any loose debris that may be present in the bay. Scuttle Panels are a common area for dirt, leaves and debris build up. In most cases we don't want these to be pushed further into crevices or difficult to reach areas.
We can then mist over the entire bay to remove any surface dirt or debris.
Common sense is obviously fairly important here as the pressure from your pressure washer can be fairly strong, so we always avoid directing the pressure washer at any sensitive components.
Once the bay has been fully rinsed, we can begin the task of thoroughly deep-cleaning.
The cleaning method is exactly the same as the underside of your bonnet. As we said you can apply Eradicate liberally to the whole area before you agitate with your brush, it's safe on all materials.
Out top tip here is to start at the back of the engine bay and work your way forward. There's no right or wrong route of course. But if you were to start further down the bay, you may find you're constantly leaning onto the already worked on areas and getting yourself covered in residue - so it's always a good idea to leave areas closer to the front bumper until nearer the end of this process.
We lightly agitate Eradicate into all areas with a Detailing Brush. Spraying our cleaner first directly into the bay and then onto the tip of the brush. Agitating in circular motion is the most effective method here.
The idea is to make contact with every area, ensuring that your cleaner can get to work. For tighter areas, like down the side of the engine you can even use a wheel brush - like our long, scratch-free Barrel Brush - to get the best access. This it allows you to reach the lower areas of the bay that may otherwise be inaccessible.
When all other detailing brushes for your wheels seem to be falling short, the Barrel Brush uses every inch of its soft scratchless bristles to get deep into t... See product details More
We continue to apply and agitate Eradicate onto all areas of the bay until it reaches a foamy consistency. You should be able to see the solution lift any dirt or grime in the foam you're creating.
As you work your way down across engine bay it's also a perfect opportunity to take advantage and clean the other areas that we can't clean when the bonnet is closed, such as the slam panel and the tops of any grills, too.
Now that we have covered all areas of the bay we can finish by rinsing it down again to remove all the contamination trapped in the solution. A great pro tip is to rinse from the right-hand side and work your way across from right to left, inspecting the engine bay as you go.
It's important to look for any areas that you may have missed. As we always say - be your own biggest critic. Inspect your work and clean any areas that may need it. After this stage we'll be moving onto finishing, and you just can't finish areas that are still dirty.
Dressing your engine bay with Dressle All Purpose Trim Dressing is quite possibly the easiest stage in detailing. You don't even have to dry your engine bay first!
Designed as a simple 'spray and walk away' product, this water based dressing is safe for use all over your bay, on any material, and will give a new lease of life to matte plastics along with rubber seals and hoses.
The great thing about Dressle is that you simply spray it on liberally, over the whole area, and then shut the bonnet to leave it to cure.
Being a versatile spray-on dressing - applying an even coat over the whole area is easy. You'll find newer vehicles with lots of black plastic trims are perfect for getting the most from your dressing - the more black plastic trims and covers in the bay the better the overall result.
While the product is spreading itself, curing and bonding to the surfaces we would usually use the time to move onto cleaning the exterior of the vehicle, then re-visit the area once the exterior is complete.
The Auto Finesse® Dressle is a versatile all-purpose Car Trim Dressing for the exterior and interior trim and must have car detailing product. This liquid, dry... See product details More
After allowing our Dressle to cure we can open the bonnet and inspect the engine bay thoroughly. If any areas require additional dressing this is the perfect stage to add a little top up. Other than that we can mop up any excess dressing for a the perfect, non-sticky satin sheen.
You may find a few areas that collect excess dressing, such as screw holes or small crevices in the plastic mouldings, our top tip is to wipe these over with an ultra soft, but extremely absorbent towel such as our Ultra Plush Microfibre.
These ultra plush microfibre cloths are 800 GSM and perfect for use with our detailing sprays, and spray waxes, also residue left by our signature waxes. The d... See product details More
After a few hours of curing, the results speak for themselves here. The easy way to clean and dress your modern engine bay.
As we said, a targeted approach is most in order for the more retro engine bays. Our cleaning agent of choice is Verso All Purpose Cleaner, a product that’s as versatile as is powerful and has many uses for a multitude of cleaning tasks inside, outside and (most importantly here) in your engine bay. This dilute-to-suit cleaning agent can be used to tackle everything from light grime to heavy, oily soiling making it perfect for use under your bonnet when you'll be wiping away contamination rather than wet rinsing.
The key here is to be targeted and extremely thorough in its use. For cleaning extremely contaminated bays we dilute our Verso at around 1:5 with water. For lighter cleaning 1:10 is more than sufficient. You can use our Pro Mixing Bottle or the Original 1-L Verso bottle with a standard trigger. What's important is that you get it in a bottle so we can spray on the cleaner.
This heavy-duty APC and degreaser can be used on all the surfaces you’ll find under your bonnet including metal, plastic and rubber. Like many exterior cleaning products, it uses powerful surfactants to break down, lift and encapsulate grime in its own solution. This allows the residue to be safely wiped away with your Microfibre Work Cloth. The difference with Verso though is, because the formula is also made up of powerful degreasing agents, it makes it ideal for shifting the kind of oil-based contamination that other cleaners cannot encapsulate. These degreasers take the fatty deposits and break them down to smaller molecules, allowing the surfactants to surround them, so they can be wiped away.
When working on engine bays such as this one, we find the best method is to spray your Verso directly onto a Detailing Brush and agitate into the surface to be cleaned. This way it’s easy to avoid any sensitive components such as exposed electrics. While in many cases it is possible to spray on the Verso directly and then agitate, we like to keep things safe on areas where we can potentially cause harm. That said, on other areas where there is no risk, such as the underside of the bonnet (again, the first area to complete) you can spray away liberally. As long as you’re targeted in your approach it can be quicker and easier than you might think. Not quite as quick as a wet wash, but pretty close.
Agitation here, as you’ll find when cleaning a modern engine bay, isn’t about physical scrubbing (or mechanical grime removal) instead it’s a way of making the most of your cleaning agent. When you’re agitating with your brush, you’re essentially carrying out two processes at the same time. First, you’re making sure that your Verso makes contact with every nook and recess as you work it into the surface. Second you’re moving away any spent solution - or cleaning agent that is now encapsulating the maximum amount of oil and grime particles - and moving it away to replace it with fresh solution. This is why a relatively soft scratch-free brush is always sufficient – you’re simply making your cleaning products even more effective.
On engine bays we’ll always complete one small area at a time, before moving onto the next. The trick is to keep the surfaces wet with your Verso, never letting the solution dry naturally.
Once you’ve agitated your Verso into each area, all that’s left is to wipe away the solution residue encapsulating all that grime. It’s a simple process but one that’s always extremely effective for targeted cleaning.
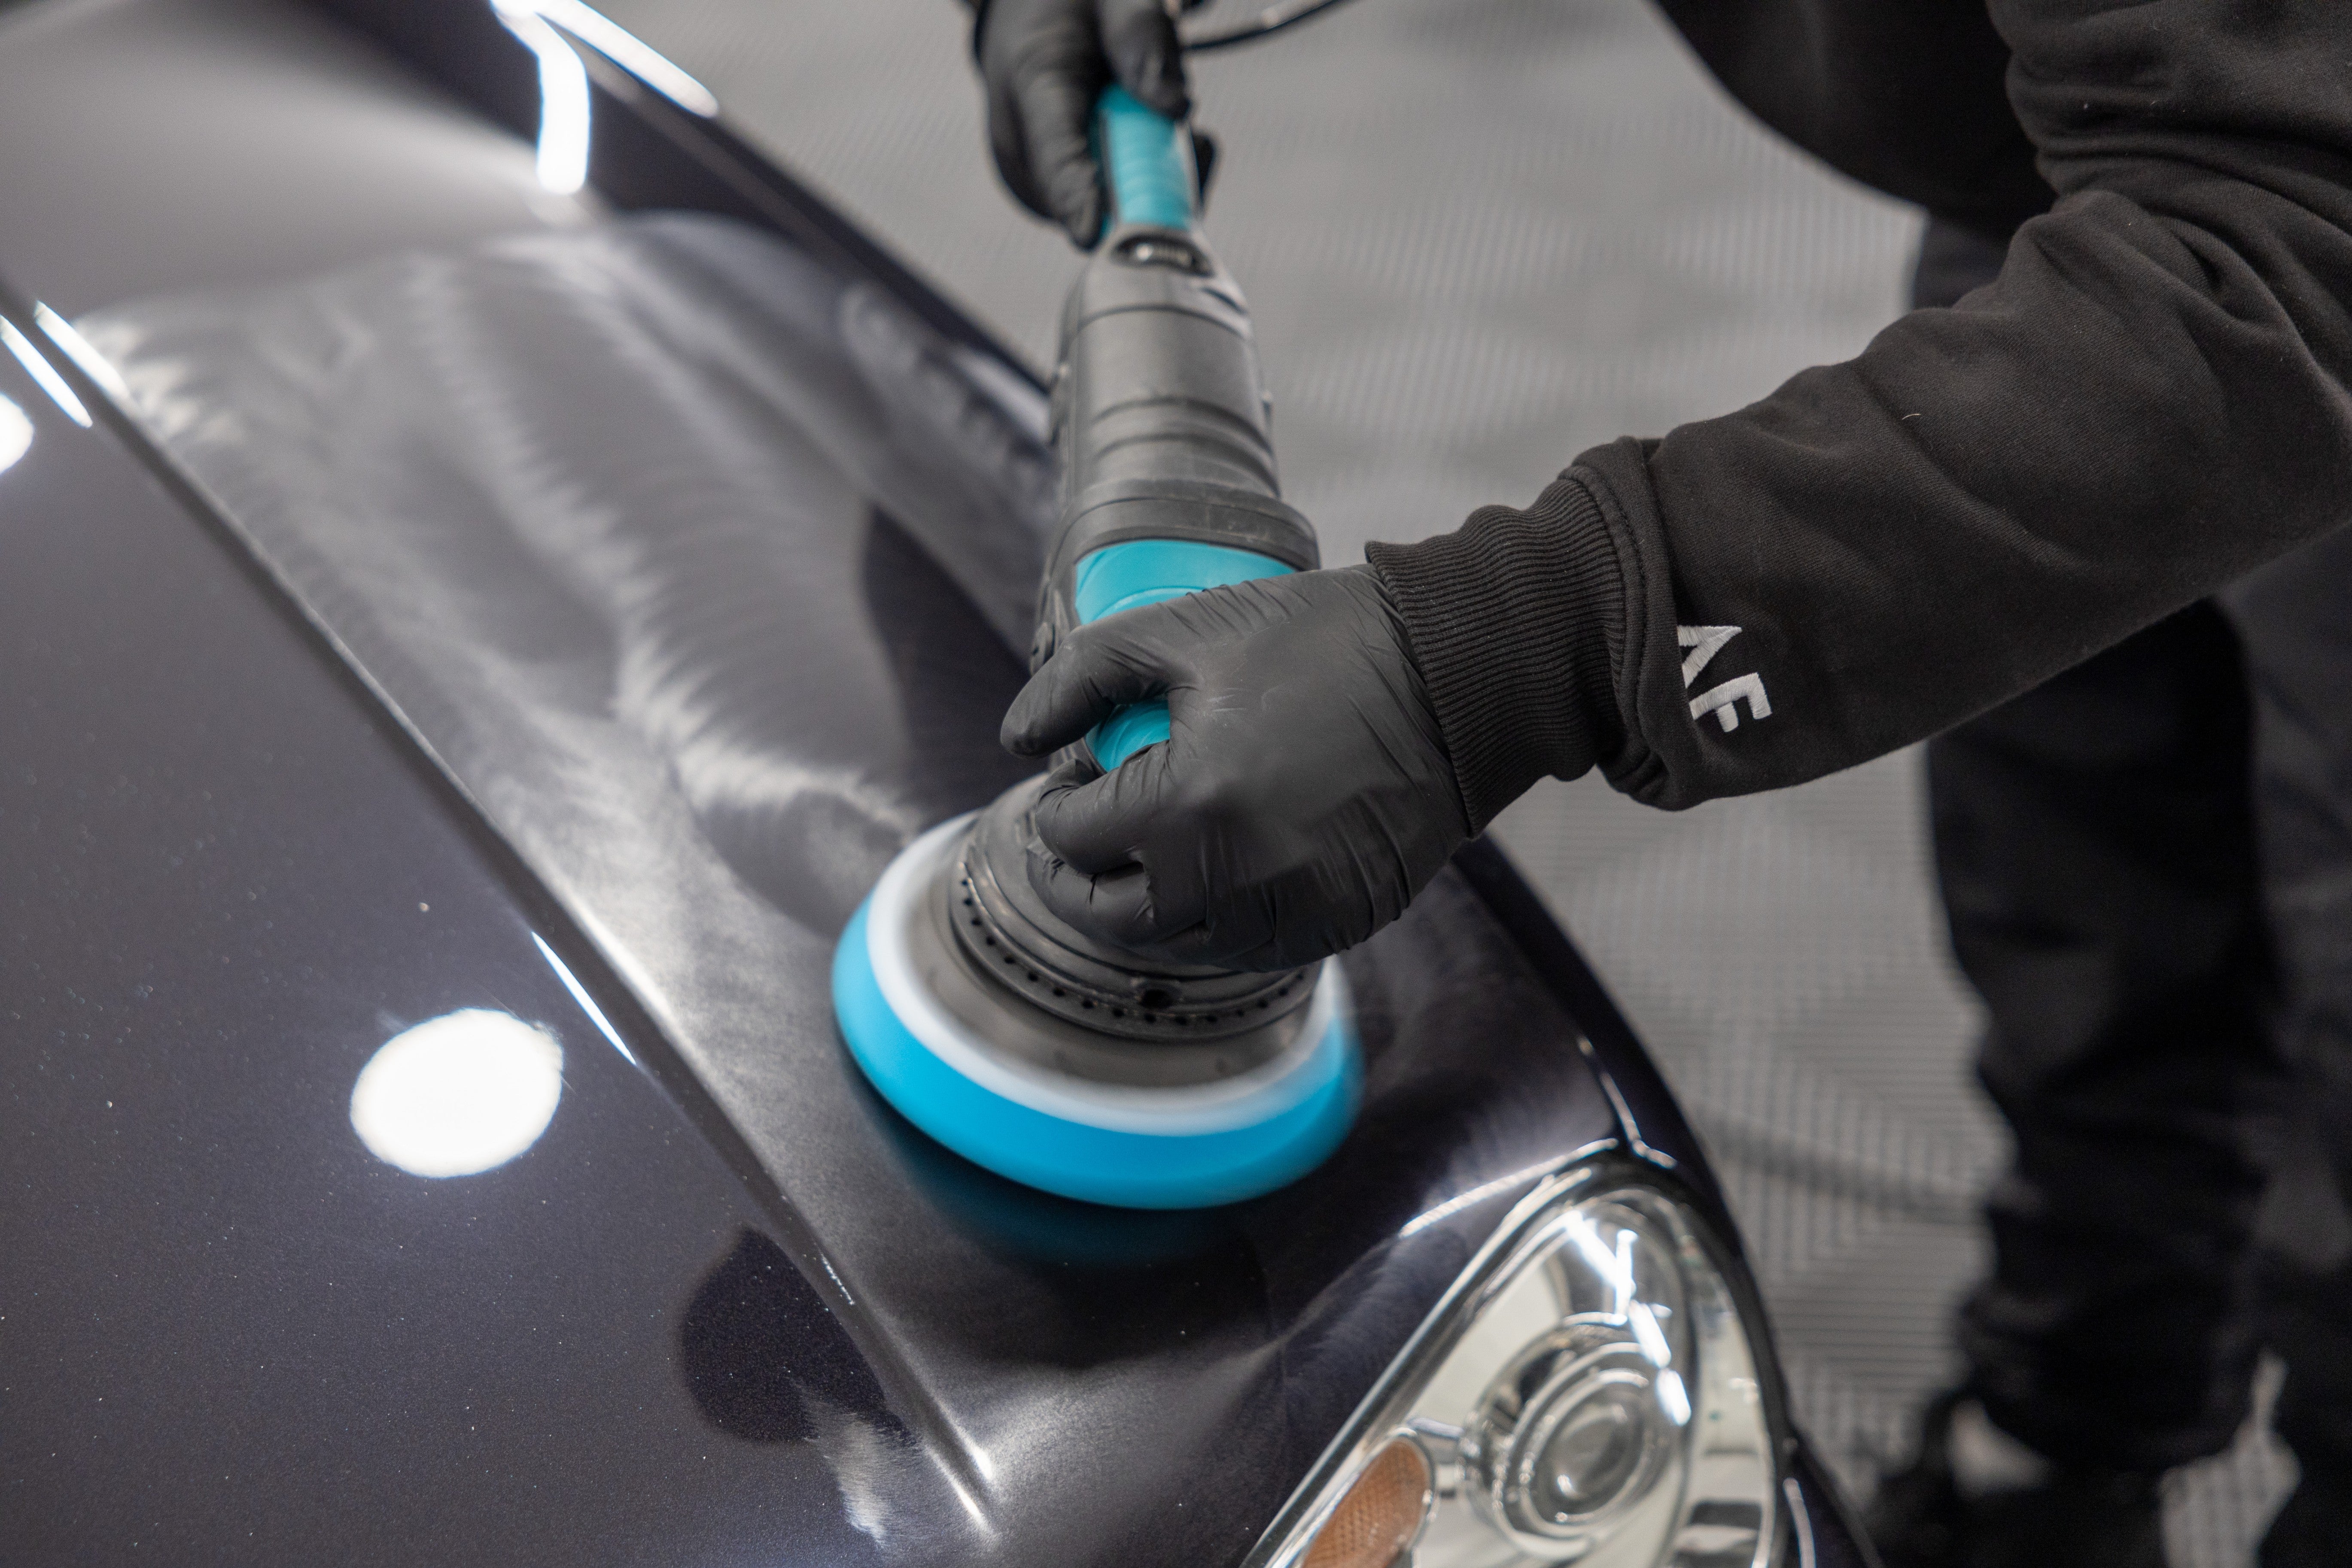
Once your engine bay is cleaned thoroughly, many will simply leave it there, but you can choose to move on to a few further enhancement and finishing stages. The optional stages you perform here of course, will always depend on the model of car. It could be a simple case of bringing rubber hoses and trim back to life with Dressle All Purpose Trim Dressing, or polishing up any painted parts with Tripple All-in-One Polish (which is also great for gloss plastics and carbon fibre parts in modified engine bays).
One thing’s for sure though, many classic engine bays respond really well to a spot of light metal polishing. You’ll find that plenty of classic cars - in addition to acres of exterior brightwork - have plenty of bare metal surfaces under the bonnet and these can be further enhanced with Mercury Metal Polish.
Mercury is classed as a cleaner polish, and that means that it not only uses advanced abrasives to strip away a tiny portion of the surface to reveal the original lustre but it also contains special deep-cleaning solvents to clear away stains and oxidation. The versatility of Mercury is the main thing here – it can be used by hand on a microfibre cloth of Microfibre Applicator or with a compact machine polisher such as our MPX Dual Action Machine Polisher and a Medium Revitalise Spot Pad. Either way, by putting in a small amount of time and effort it is possible to take your bay from something like this…
To something like this...
Mercury Metal Polish is an advanced abrasive compound developed specifically for restoring bare metal to a factory fresh finish. Suitable for use on all types... See product details More
Congratulations on completing the Engine Bay Cleaning Modern vs Classic Course!
Before you go, don't forget to have a peek at some extra resources that you can take advantage of right now to continue your learning. We have a whole selection of online resources in the Guides section of our blog.
We welcome your feedback and hope you've enjoyed the course. Don't forget to shout about your new skills and knowledge, and share your progress on Social Media, too!
If you have any questions after you go, please don't hesitate to send an email to support@autofinesse.com